Transmission Fluid Level and Condition Check
Automatic Transmission - 10L80 MHS MQC | Diagnostic Information and Procedures | Document ID: 4974697 This procedure checks both the transmission fluid level, as well as the condition of the fluid itself.
- Observe the TFT using the driver information center (DIC) or a scan tool.
- Start and idle the engine.
- Depress the brake pedal and move the shift lever through each gear range. Pause for at least 3 seconds in each range. Move the shift lever back to PARK. Ensure the engine RPM is low (500–800 RPM).
- Allow the engine to idle for at least 1 minute.
- Raise the vehicle on a hoist. The vehicle must be level, with the engine running and the shift lever in the PARK range.
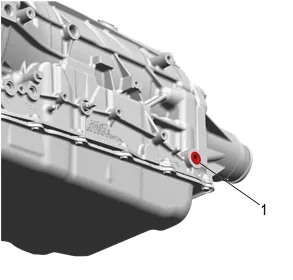
Danger: Transmission fluid is flammable and the area around the automatic transmission case plug is hot due to the proximity of the exhaust system components. Always wear protective gloves to avoid personal injury. When draining the transmission, protect all exhaust components including the catalytic converter and catalytic converter heat shield from making contact with transmission fluid. Failure to do this could cause smoke and/or a fire resulting in serious bodily injury or severe vehicle damage.
- Remove the automatic transmission case plug (1) from the transmission. Allow any fluid to drain. If the fluid is flowing as a steady stream, wait until the fluid begins to drip. If no fluid comes out, add fluid until fluid comes out in a steady stream and then drips out. Transmission Fluid Fill Procedure
- Inspect the fluid color. The fluid should be red or dark brown. If the fluid color is very dark or black and has a burnt odor, inspect the fluid and inside of the bottom pan for excessive metal particles or other debris. A small amount of “friction” material in the bottom pan is a “normal” condition. If large pieces and/or metal particles are noted in the fluid or bottom pan, flush the oil cooler and cooler lines and overhaul the transmission. If there are no signs of transmission internal damage noted, replace the fluid filter assembly, repair the oil cooler, and flush the cooler lines. Fluid that is cloudy or milky or appears to be contaminated with water indicates engine coolant or water contamination. Engine Coolant/Water in Transmission
- If a NEW threaded component is being installed, loosen the adhesive using a metal pick or similar tool before proceeding. If threaded component is reused, prepare the threaded component using the following steps: 8.1. Remove any loose cured adhesive from the external threads of the component using a lint free cloth. 8.2. Thread the cleaned component into the internal mating threads and remove to loosen trapped cured adhesive. 8.3. Remove loose debris from internal and external threads using compressed air. 8.4. Apply liquid thread locking adhesive in a strip along half of the length of the external threads, starting at the tip, just prior to installation. Adhesives, Fluids, Lubricants, and Sealers
- Install the automatic transmission case plug and tighten. Fastener Specifications
- Inspect for external leaks. Fluid Leak Diagnosis