Mode Valve Actuator Replacement
Special Tool Wipers and Washers J-39822 Wiper Arm Puller Equivalent regional tools: Special Tools Removal Procedure
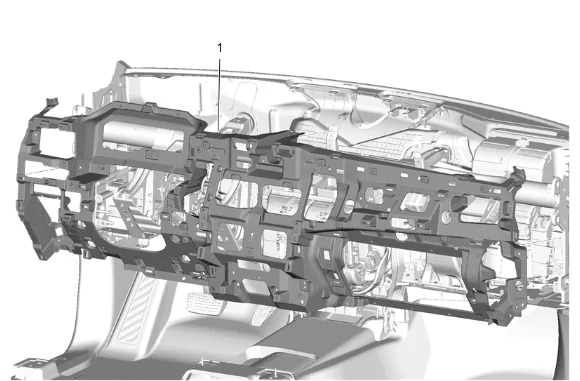
- Instrument Panel Carrier (1) » Remove — Instrument Panel Carrier Replacement
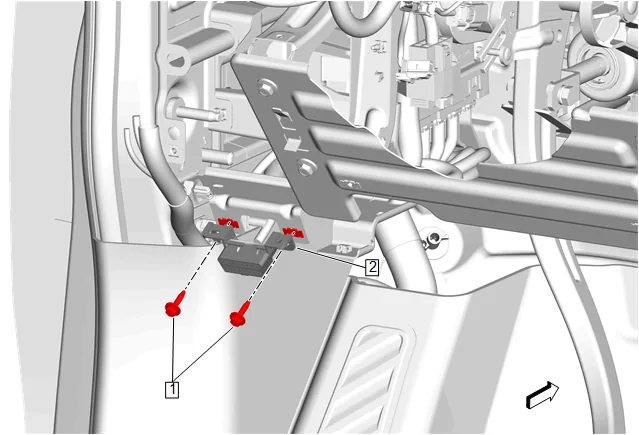
- Data Link Connector Bolt (1) » Remove [2x]
- Data Link Connector (2) » Reposition away
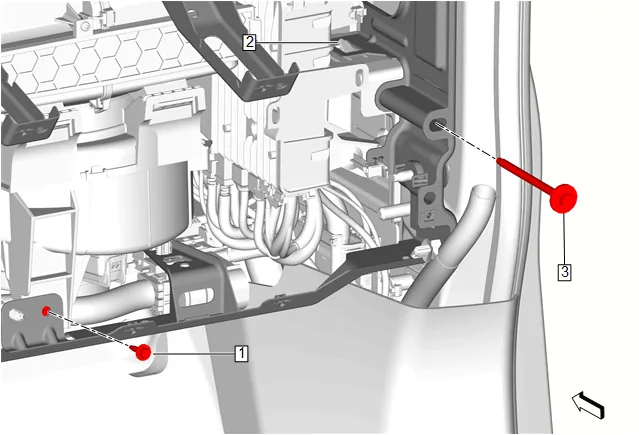
- Heater and Air Conditioning Evaporator and Blower Module Bolt (1) » Remove
- Use a suitable tool to push the tab (2) down.
- Instrument Panel Tie Bar Bolt (3) » Remove
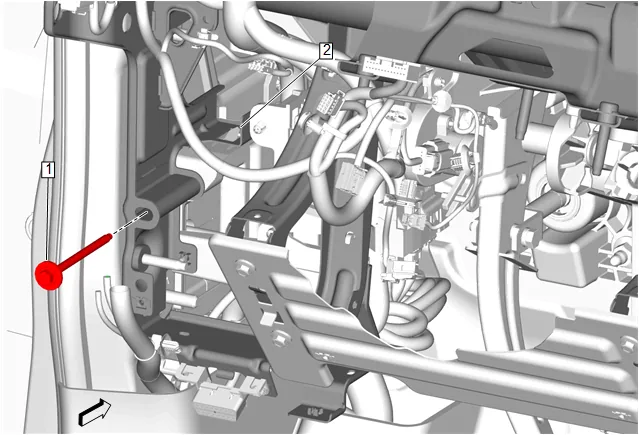
- Instrument Panel Tie Bar Bolt (1) » Remove
- Use a suitable tool to push the tab (2) down.
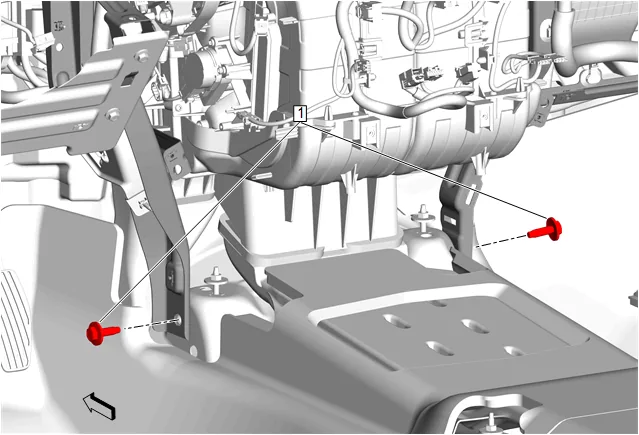
- Instrument Panel Tie Bar Bolt (1) @ Floor Panel Tunnel Panel » Remove [2x]
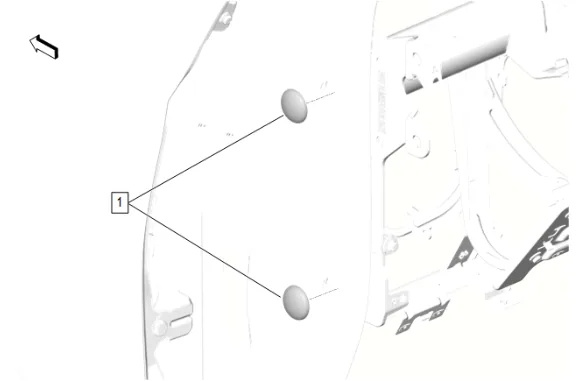
- Body Hinge Pillar Outer Panel Hole Plug (1) » Remove [2x]
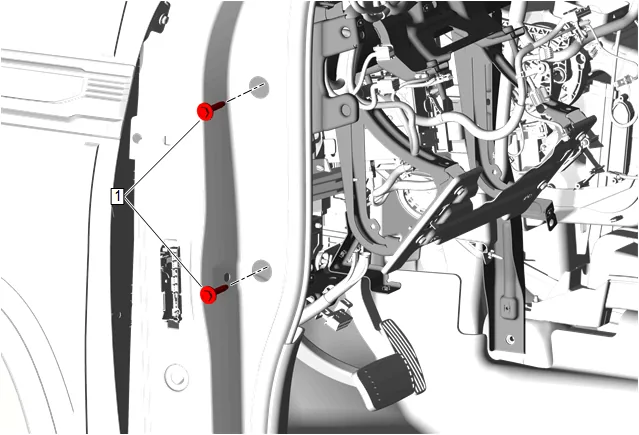
- Instrument Panel Tie Bar Bolt (1) @ Front Side Door » Remove [2x]
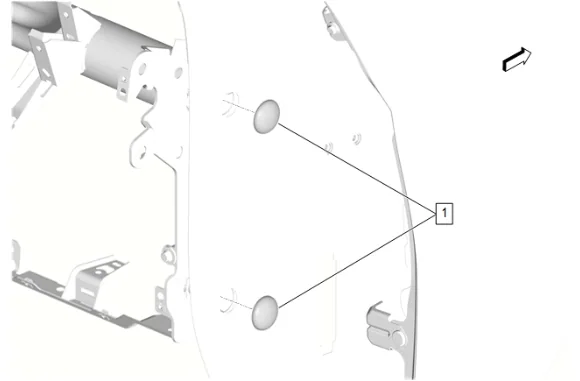
- Body Hinge Pillar Outer Panel Hole Plug (1) » Remove [2x]
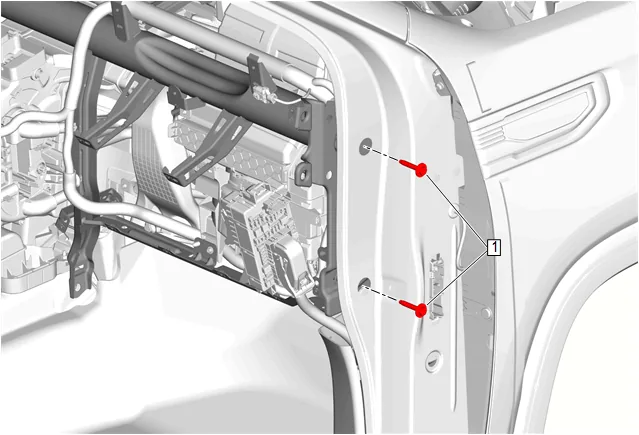
- Instrument Panel Tie Bar Bolt (1) @ Front Side Door » Remove [2x]
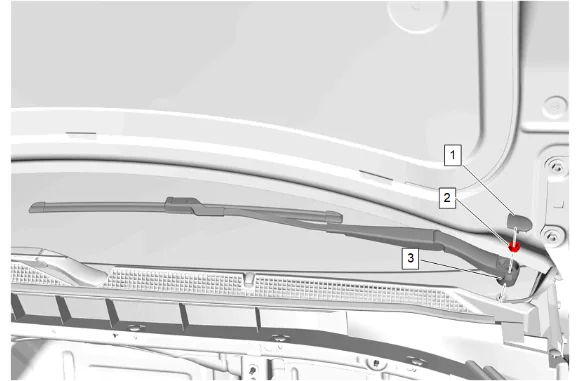
- Using the appropriate trim tool, remove the 2 windshield wiper arm finish caps (1) from both windshield wiper arms (3).
- Windshield Wiper Arm Nut (2) » Remove [2x]
- Use the J-39822 Wiper Arm Puller to remove the windshield wiper arms (3) from the left and right side windshield wiper transmission pivot shaft.
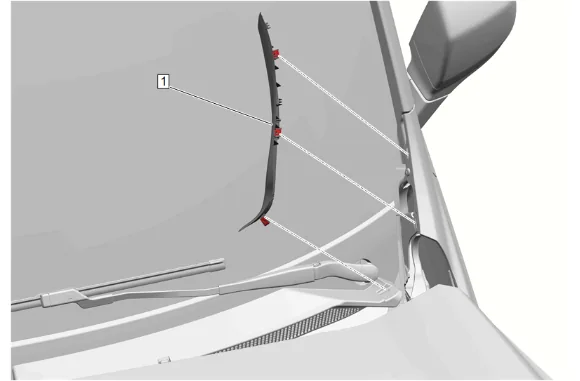
- Apply two layers of masking tape to the painted surface around the top edge of the air inlet grille panel extensions (1) to prevent paint damage.
- Using a suitable plastic trim tool, carefully release the air inlet grille panel extension clips.
- Air Inlet Grille Panel Extension (1) » Remove [2x]
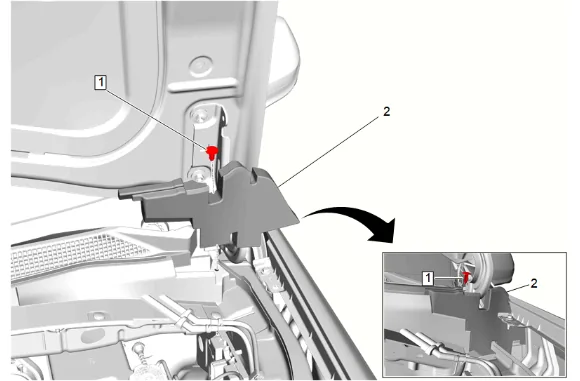
- Hood Rear Outer Air Inlet Seal Retainer (1) » Remove [2x]
- Hood Rear Outer Air Inlet Seal (2) » Remove [2x]
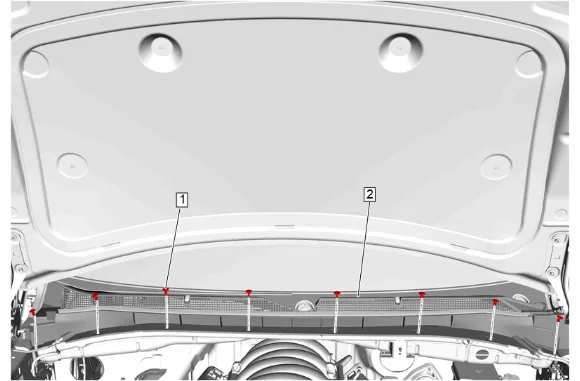
- Air Inlet Grille Panel Retainer (1) » Remove [8x]
- Windshield Washer Nozzle Hose » Disconnect [3x]
- Lift the front edge of the air inlet grille panel (2) and slide the panel forward from both hood hinges to remove.
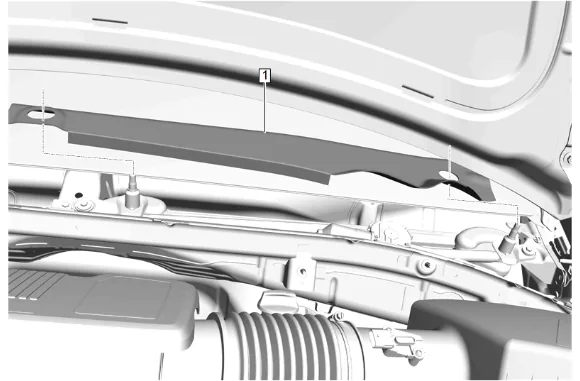
- Windshield Wiper System Module Shield (1) » Remove
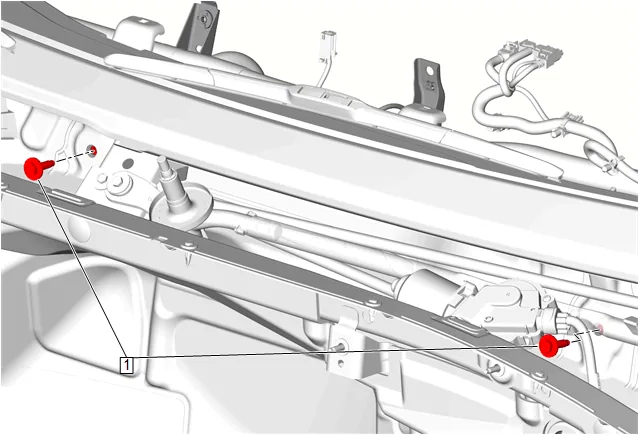
- Instrument Panel Tie Bar Bolt (1) @ Plenum Lower Panel » Remove [2x]
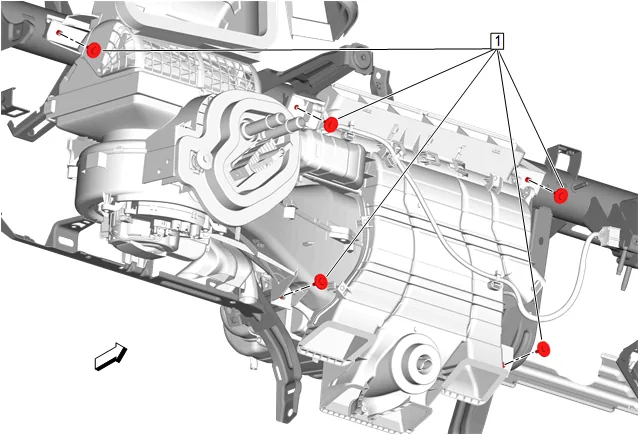
- Heater and Air Conditioning Evaporator and Blower Module Bolt (1) @ Heater and Air Conditioning Evaporator and Blower Module » Remove [5x]
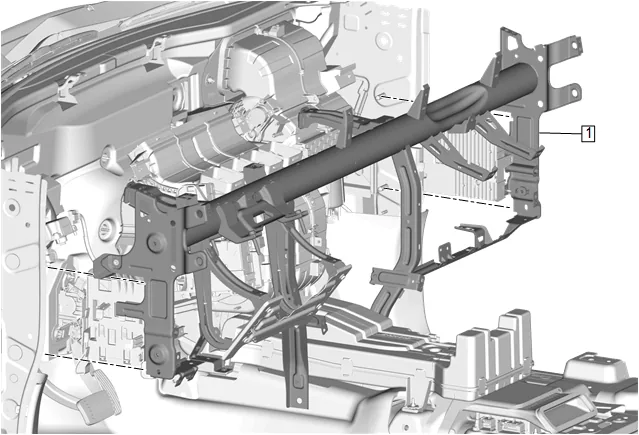
- Disconnect the wiring harness and retainers from the instrument panel tie bar assembly (1) as necessary.
- Instrument Panel Tie Bar (1) » Remove
- Support the heater and air conditioning evaporator and blower module in order to prevent damage.
- With the aid of an assistant, remove the instrument panel tie bar assembly from the vehicle. (1)
-
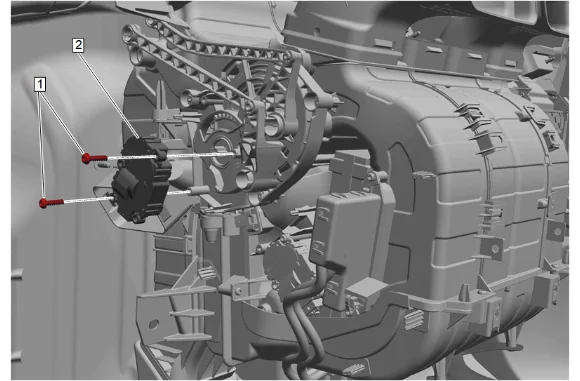
Heater and Air Conditioning Evaporator and Blower Module Bolt (1) » Remove [2x]
-
Mode Valve Actuator (2) » Remove
-
Disconnect the electrical connector. Installation Procedure
-
Mode Valve Actuator (2) » Install
-
Heater and Air Conditioning Evaporator and Blower Module Bolt (1) » Install and tighten [2x] — Fastener Specifications
-
Connect the electrical connector.
-
With the aid of an assistant, position the instrument panel tie bar assembly into the vehicle.
-
Instrument Panel Tie Bar (1) » Install
-
Attach the wiring harness and connect the electrical connectors as necessary.
-
Remove the support from the heater and air conditioning evaporator and blower module.
-
Heater and Air Conditioning Evaporator and Blower Module Bolt (1) @ Heater and Air Conditioning Evaporator and Blower Module » Install and tighten [5x] — Fastener Specifications
-
Instrument Panel Tie Bar Bolt (1) @ Plenum Lower Panel » Install and tighten [2x] — Fastener Specifications
-
Windshield Wiper System Module Shield (1) » Install
-
Air Inlet Grille Panel (2) » Install
-
Windshield Washer Nozzle Hose » Connect [3x]
-
Air Inlet Grille Panel Retainer (1) » Install [8x]
-
Hood Rear Outer Air Inlet Seal (2) » Install [2x]
-
Hood Rear Outer Air Inlet Seal Retainer (1) » Install [2x]
- Air Inlet Grille Panel Extension (1) » Install [2x]
- Remove the double layer of masking tape around the perimeter of the painted surfaces.
- Using a 50/50 mixture of isopropyl alcohol and clean drinkable water with a clean towel, remove any left over adhesive residue from the masking tape.
- Instrument Panel Tie Bar Bolt (1) @ Front Side Door » Install and tighten [2x] — Fastener Specifications
- Body Hinge Pillar Outer Panel Hole Plug (1) » Install [2x]
- Instrument Panel Tie Bar Bolt (1) @ Front Side Door » Install and tighten [2x] — Fastener Specifications
-
Body Hinge Pillar Outer Panel Hole Plug (1) » Install [2x]
-
Instrument Panel Tie Bar Bolt (1) @ Floor Panel Tunnel Panel (1) » Install and tighten [2x] — Fastener Specifications
-
Instrument Panel Tie Bar Bolt (1) » Install and tighten — Fastener Specifications
-
Use a suitable tool to push the tab (2) in the up position.
-
Heater and Air Conditioning Evaporator and Blower Module Bolt (1) » Install and tighten — Fastener Specifications
-
Use a suitable tool to push the tab (2) in the up position.
-
Instrument Panel Tie Bar Bolt (3) » Install and tighten — Fastener Specifications
-
Data Link Connector (2) » Install
-
Data Link Connector Bolt (1) » Install and tighten [2x] — Fastener Specifications
-
Instrument Panel Carrier (1) » Install — Instrument Panel Carrier Replacement
-
Clean the left and right side windshield wiper transmission pivot shaft splines with a soft wire brush before installing the windshield wiper arm.
-
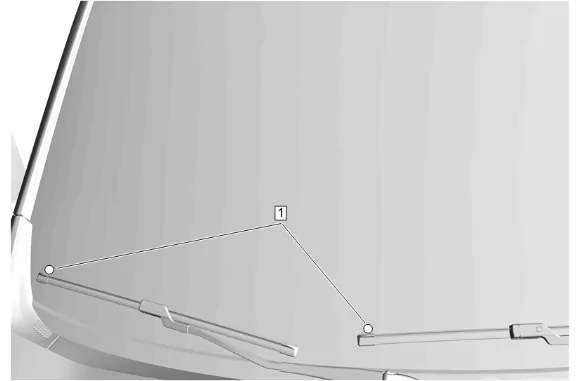
Align the windshield wipers to their respective alignment circles (1) on the windshield.
-
Windshield Wiper Arm (3) » Install [2x]
-
Windshield Wiper Arm Nut (2) » Install and tighten [2x] — Fastener Specifications
-
Lubricate the windshield with clean washer fluid.
-
Run the windshield wipers for two complete cycles then turn off the windshield wipers.
-
Ensure the windshield wipers are in the full park position.
-
If alignment is required, remove the windshield wiper arms and repeat steps 33 through 39 to achieve the proper windshield wiper (3) alignment.
-
Windshield Wiper Arm Finish Cap (1) » Install [2x]