Fluid Leak Diagnosis
Automatic Transmission - 10L80 MHS MQC | Diagnostic Information and Procedures | Document ID: 4572734 General Method
- Verify that the leak is transmission fluid.
- Thoroughly clean the suspected leak area using a rag.
- Operate the vehicle for 15–20 minutes under city driving conditions until normal operating temperatures are reached.
- Park the vehicle over clean paper or cardboard.
- Shut OFF the engine.
- Look for fluid spots on the paper.
- Make the necessary repairs. Powder Method
- Thoroughly clean the suspected leak area using a rag.
- Apply an aerosol type powder, such as foot powder, to the suspected leak area.
- Operate the vehicle for 15–20 minutes under city driving conditions until normal operating temperatures are reached.
- Shut OFF the engine.
- Inspect the suspected leak area.
- Trace the leak path through the powder in order to find the source of the leak.
- Make the necessary repairs. Dye and Black Light Method A fluid dye and black light kit is available from various tool manufacturers.
- Follow the manufacturer’s instructions in order to determine the amount of dye to use.
- Detect the leak with the black light.
- Make the necessary repairs. Find the Cause of the Leak Pinpoint the leak and trace the leak back to the source. You must determine the cause of the leak in order to repair the leak properly. For example, if you replace a gasket, but the sealing flange is bent, the new gasket will not repair the leak. You must also repair the bent flange. Before you attempt to repair a leak, check for the following conditions, and make repairs as necessary: Gaskets Fluid level/pressure is too high Plugged vent or drain-back holes Improperly tightened fasteners Dirty or damaged threads Warped flanges or sealing surface Scratches, burrs, or other damage to the sealing surface Damaged or worn gasket Cracking or porosity of the component Improper sealant used, where applicable Incorrect gasket Seals Fluid level/pressure is too high Plugged vent or drain-back holes Damaged seal bore Damaged or worn seal Improper installation Cracks in component Manual or output shaft surface is scratched, nicked, or damaged Loose or worn bearing causing excess seal wear Possible Points of Fluid Leaks Transmission Oil Pan Incorrectly tightened oil pan bolts Improperly installed or damaged oil pan gasket Damaged oil pan or mounting face Incorrect oil pan gasket Case Leak Worn or damaged extension case seal Damaged manual shaft seal Loose or damaged oil cooler connector fittings Worn or damaged propeller shaft oil seal Loose line pressure pipe plug Porous casting warped torque converter housing Leak at the Torque Converter End Converter leak in the weld area Converter seal lip cut. Check the converter hub for damage Converter seal bushing moved forward and damaged Converter seal garter spring missing from the seal Porous casting of the transmission case or the oil pump Worn or damaged stator shaft support seal. Leak at the Vent Pipe Overfilled system Water or coolant in the fluid; The fluid will appear milky Transmission case porous Incorrect fluid level indicator Plugged vent Drain-back holes plugged Leak Inspection Points
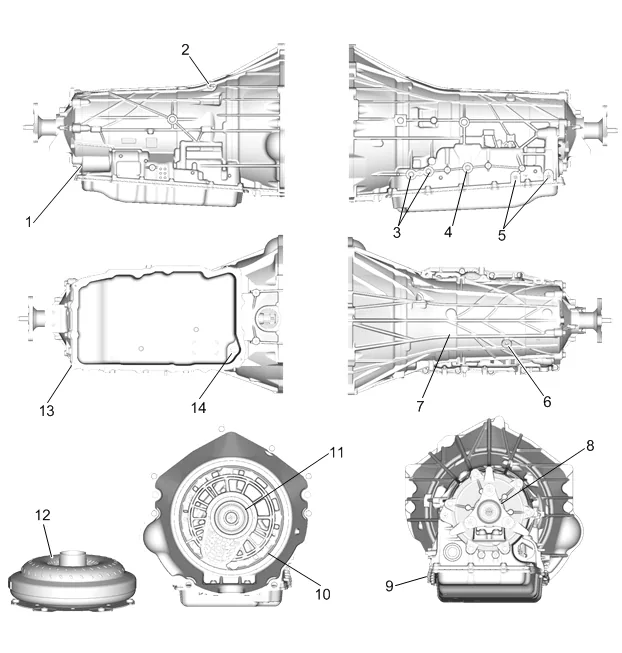
- Automatic Transmission Wiring Harness
- Automatic Transmission Vent
- Transmission Cooler Pipe Fitting Seal
- Manual Shift Shaft Seal
- Automatic Transmission Side Case Plug
- Automatic Transmission Top Case Plug
- Automatic Transmission Case Assembly
- Propeller Shaft Transmission Flange Fluid Seal
- Automatic Transmission Fluid Pan Gasket
- Automatic Transmission Case Front Cover Seal
- Torque Converter Fluid Seal
- Torque Converter
- Automatic Transmission Case Extension Seal
- Transmission Fluid Fill Tube Plug