Front and Rear and 3rd Row Roof Rail Airbag Replacement - Right Side
Front and Rear and 3rd Row Roof Rail Airbag Replacement
- Right Side Removal Procedure
- Disable the SIR system. SIR Disabling and Enabling
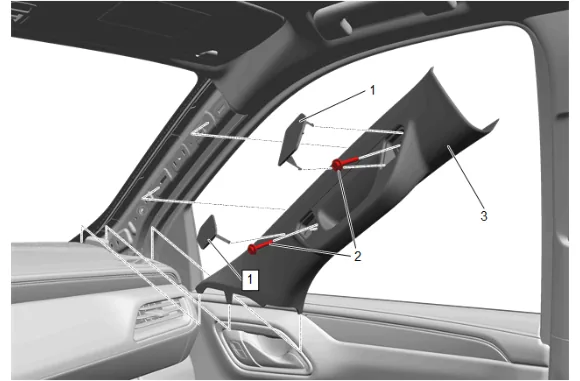
- Windshield Pillar Assist Handle Cover (1) » Remove [2x]
- Windshield Pillar Assist Handle Bolt (2) » Remove [2x]
- Windshield Garnish Molding - Right Side (3) » Remove
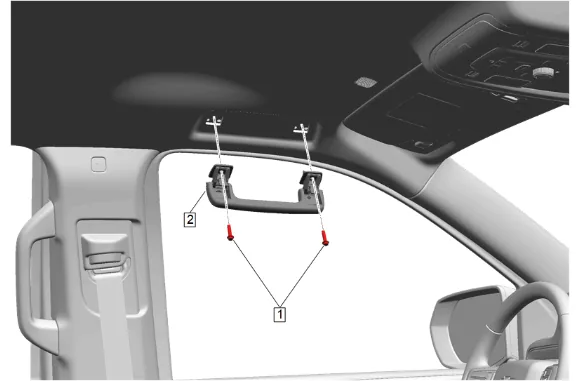
- Fold the assist handle downward and hold. (2)
- Use a small flat-bladed tool to open the assist handle covers to access the bolts.
- Roof Rail Assist Handle Bolt (1) » Remove [2x]
- Roof Rail Assist Handle (2) » Remove
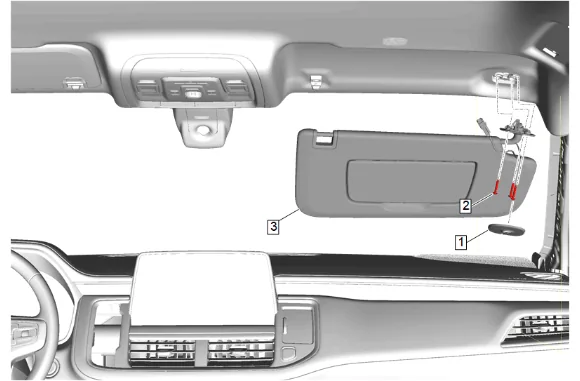
- Sunshade Retainer Bolt Cover (1) » Remove
- Sunshade Bolt (2) » Remove [3x]
- Squeeze the tabs at the base of the sunshade (3) to detach it from the roof panel and allow the headliner with the sunshade attached to be lowered.
- Disconnect the electrical connector.
- Release the retainer attaching the sunshade (3) to the headlining trim panel.
- Sunshade - Right Side (3) » Remove
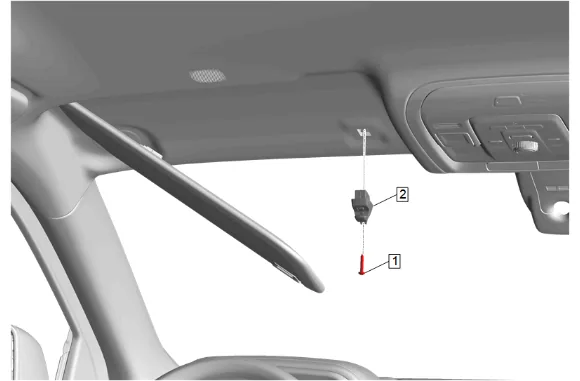
- Open the sunshade support bolt access covers with an appropriate tool on both sides of vehicle.
- Sunshade Support Bolt (1) » Remove [2x]
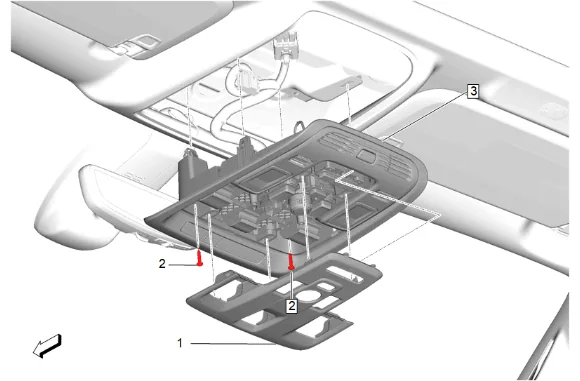
- Using a flat-bladed plastic trim tool, release the retaining clips.
- Roof Console Opening Trim Plate (1) » Remove
- Roof Console Bolt (2) » Remove [2x]
- Roof Console (3) » Remove
- Disconnect the electrical connectors.
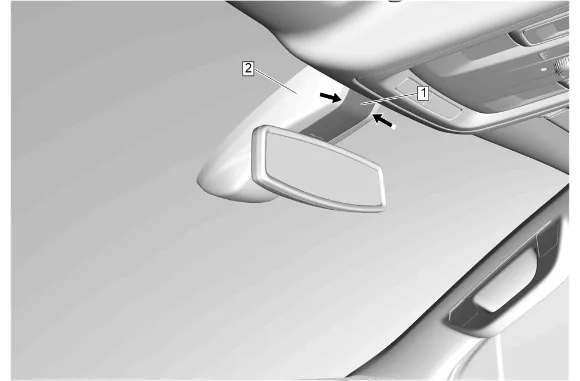
- Insert a suitable flat-bladed plastic trim tool between the windshield multifunction sensor mount bracket cover insert (1) and windshield multifunction sensor mount bracket cover (2).
- Separate the windshield multifunction sensor mount bracket cover insert (1) from the windshield multifunction sensor mount bracket cover (2).
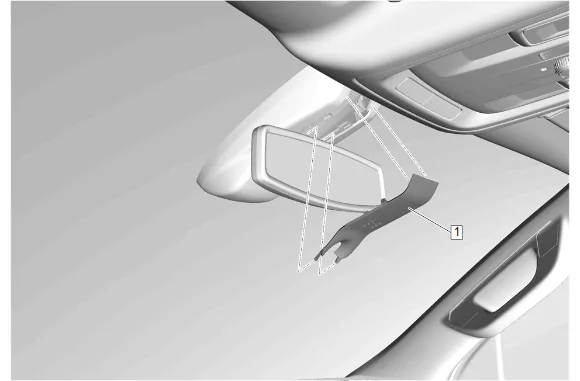
- Windshield Multifunction Sensor Mount Bracket Cover Insert (1) » Remove
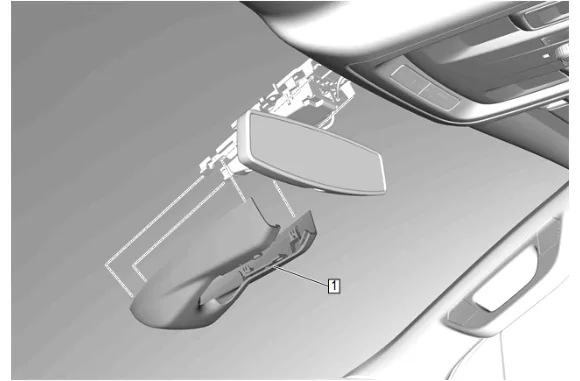
- Using a suitable plastic trim tool, carefully pry downward on the windshield multifunction sensor mount bracket cover (1) to release it from the windshield.
- Pull downward to remove the windshield multifunction sensor mount bracket cover (1) from the windshield.
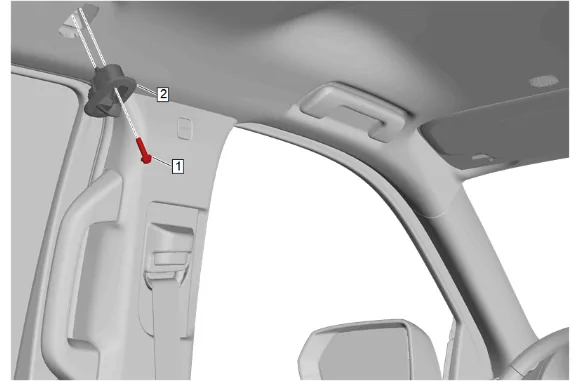
- Place the coat hook (2) in the open position.
- Coat Hook Bolt (1) » Remove [2x]
- Coat Hook (2) » Remove [2x]
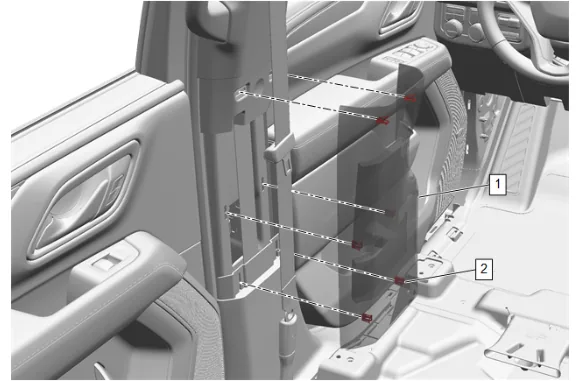
- Move the front seat fully forward.
- Use a flat bladed plastic tool between the center pillar center trim panel (1) and the center pillar upper trim panel to disengage the upper retaining clips (2).
- Pull from both sides of the center pillar center trim panel (1) to release the middle and lower retaining clips (2).
- Center Pillar Center Trim Panel (1) » Remove
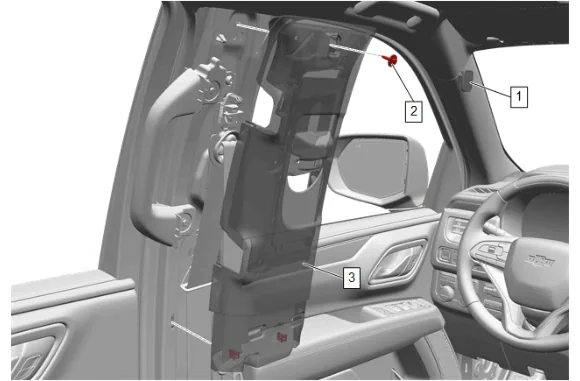
- Center Pillar Upper Trim Panel Bolt Cap (1) » Remove
- Center Pillar Upper Garnish Molding Bolt (2) » Remove
- Pull the trim panel (3) toward the inside of the vehicle to disengage the retaining clips.
- Center Pillar Upper Trim Panel (3) » Reposition
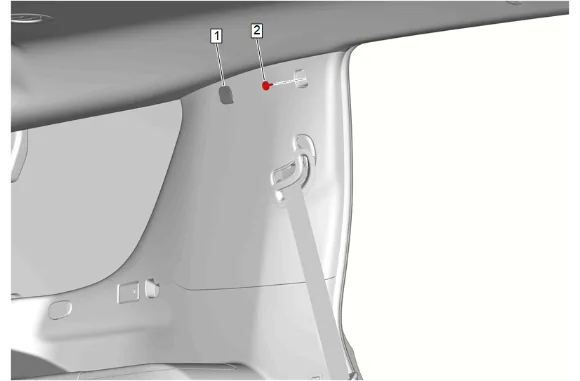
- Quarter Window Trim Finish Panel Bolt Cap (1) » Remove
- Quarter Window Trim Finish Panel Bolt (2) » Remove
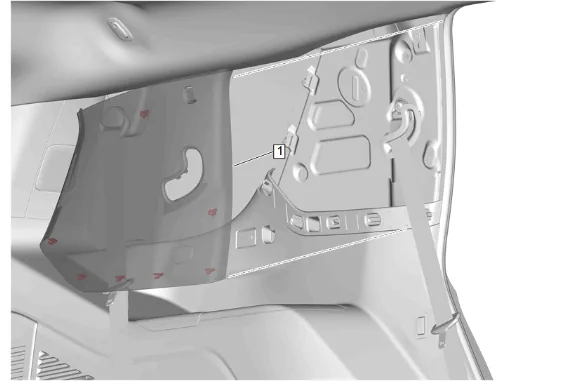
- Use a flat-bladed plastic trim tool to disengage the body lock pillar upper trim panel (1) and retaining clips.
- Body Lock Pillar Upper Trim Panel (1) » Reposition
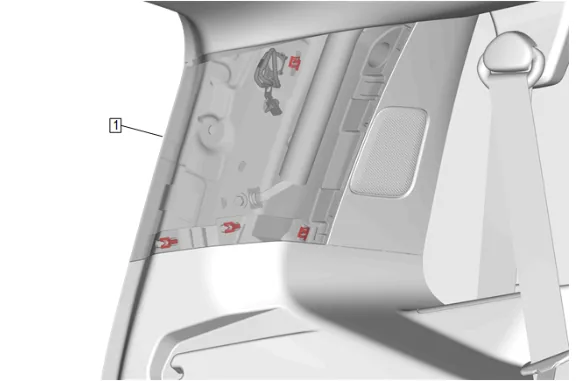
- Use a flat-bladed plastic trim tool to disengage the body side rear window garnish molding (1) and retaining clips.
- Body Side Rear Window Garnish Molding (1) » Reposition
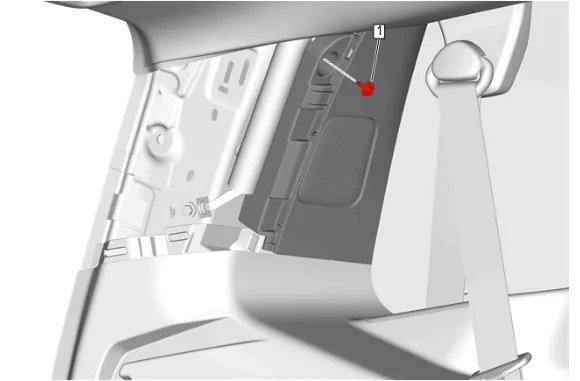
- Body Rear Corner Upper Garnish Molding Bolt (1) » Remove
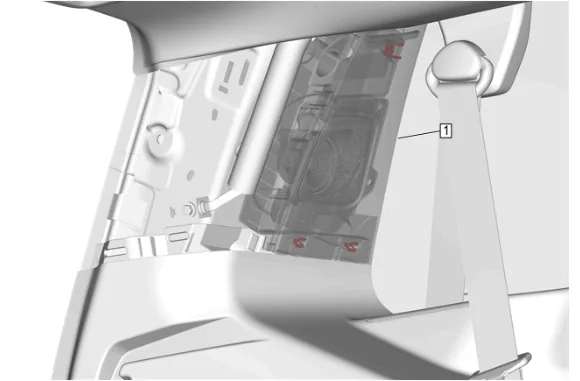
- Use a flat-bladed plastic trim tool to disengage the body rear corner upper garnish molding (1) and retaining clips.
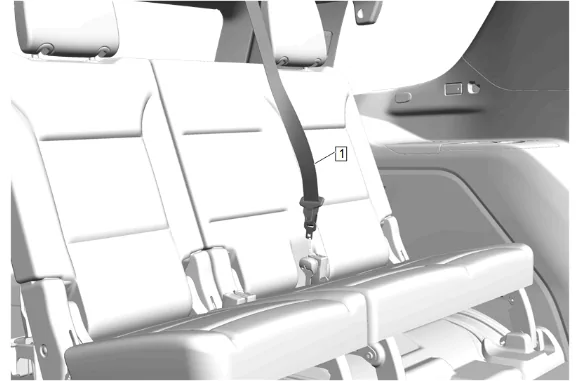
- Disconnect the rear seat belt mini-latch (1).
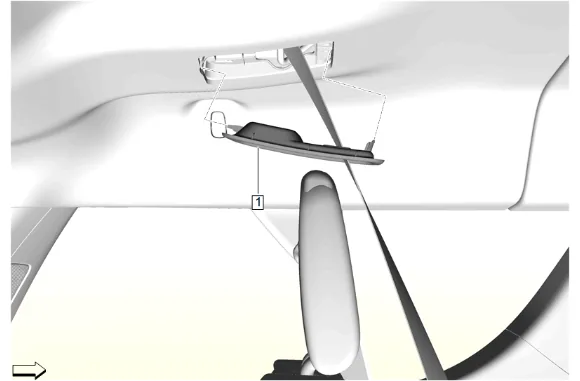
- Using a suitable plastic trim tool, release the retaining tabs.
- Rear Seat Center Belt Opening Bezel - 3rd Row Seat (1) » Remove
- Feed the 3rd row seat center belt through the rear seat center belt opening bezel (1).
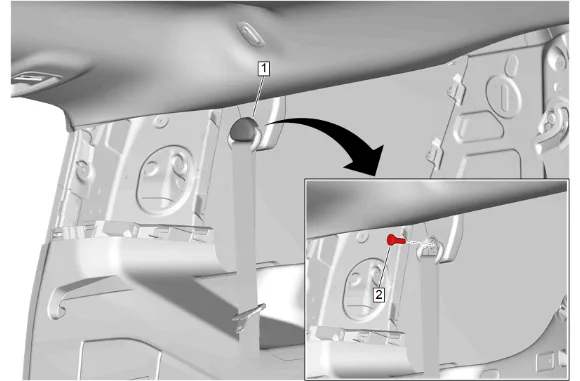
- 3rd Row Seat Belt Guide Cover (1) » Open
- Rear Seat Belt Guide Bolt (2) » Remove [2x]
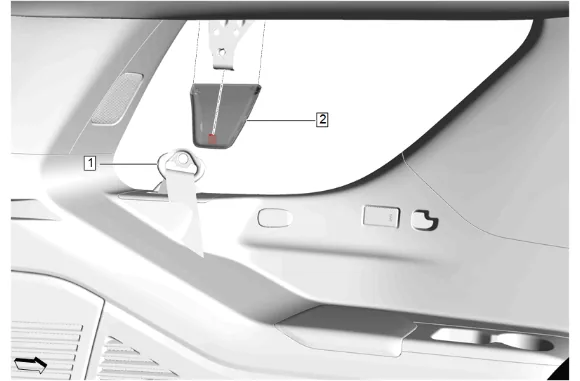
- 3rd Row Seat Belt Guide (1) » Reposition
- Using a suitable trim tool, gently pry and pull downwards on the rear seat belt opening bezel (2) to release the retaining clip on both sides of the vehicle.
- Rear Seat Belt Opening Bezel (2) » Remove [2x]
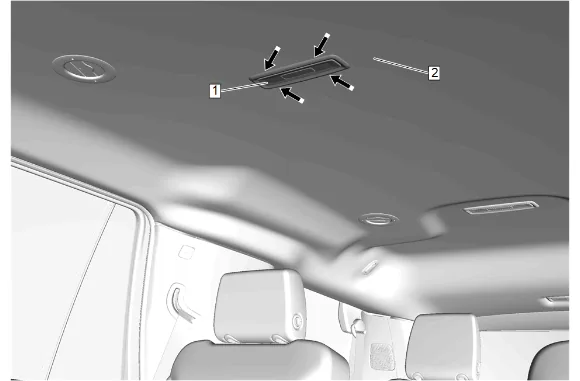
- Insert a suitable flat-bladed plastic trim tool between the rear seat position center reading and courtesy lamp (1) and headlining trim panel (2).
- { If equipped } separate the rear seat position center reading and courtesy lamp (1) from the headlining trim panel (2).
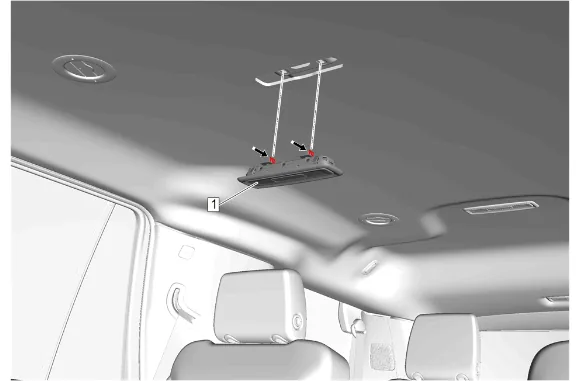
- Pull downward to release the retaining tabs.
- Disconnect the electrical connector.
- { If equipped } Rear Seat Position Center Reading and Courtesy Lamp - Front (1) » Remove
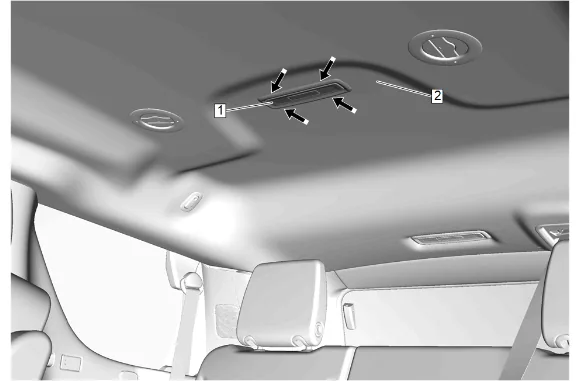
- Insert a suitable flat-bladed plastic trim tool between the rear seat position center reading and courtesy lamp (1) and headlining trim panel (2).
- Separate the rear seat position center reading and courtesy lamp (1) from the headlining trim panel (2).
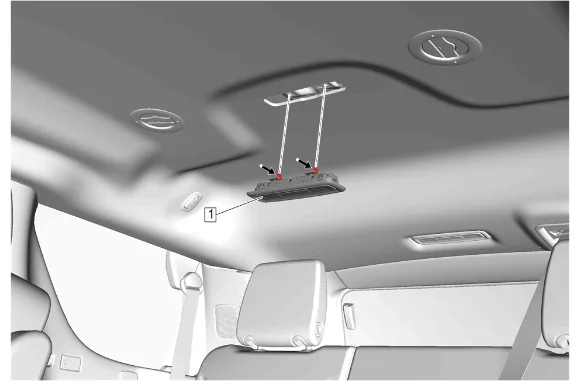
- Pull downward to release the retaining tabs.
- Disconnect the electrical connector.
- Rear Seat Position Center Reading and Courtesy Lamp - Rear (1) » Remove
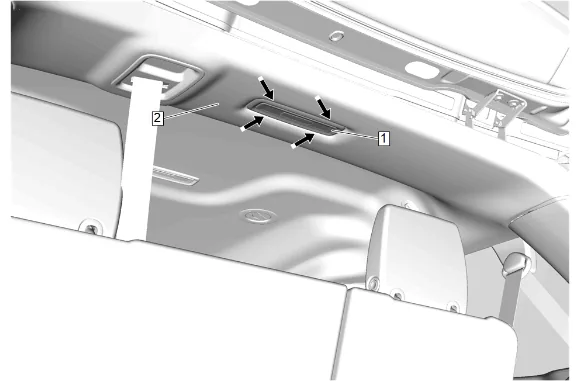
- Insert a suitable flat-bladed plastic trim tool between the cargo center courtesy lamp (1) and headlining trim panel (2).
- Separate the cargo center courtesy lamp (1) from the headlining trim panel (2).
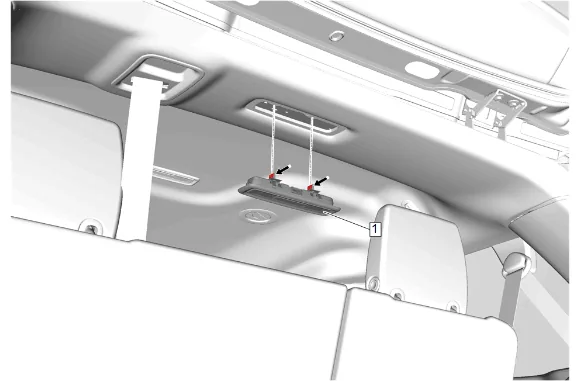
- Pull downward to release the retaining tabs.
- Disconnect the electrical connector.
- Cargo Center Courtesy Lamp (1) » Remove
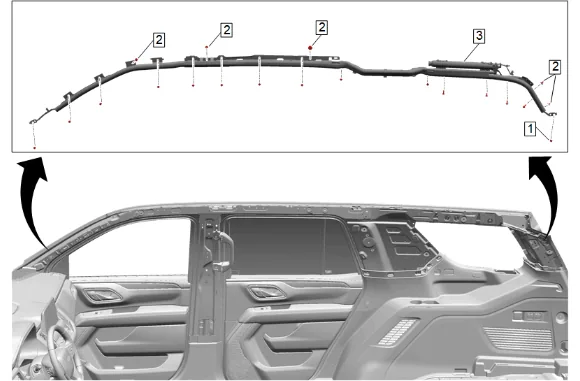
- Lower the headlining trim panel.
- Roof Rail Airbag Bolt (1) » Remove [15x]
- Front and Rear and 3rd Row Seat Roof Rail Airbag Retainer (2) » Remove [5x]
- Disconnect the electrical connectors and wire harness retainers.
- Remove the front and rear row seat roof rail airbag (3) from the vehicle through the liftgate opening. Installation Procedure
- Install the front and rear row seat roof rail airbag (3) into the vehicle through the liftgate opening.
- Connect the electrical connectors and wire harness retainers.
- Front and Rear and 3rd Row Seat Roof Rail Airbag Retainer (2) » Install [5x]
-
Roof Rail Airbag Bolt (1) » Install and tighten [15x] — Fastener Specifications
-
Connect the electrical connector.
-
Cargo Center Courtesy Lamp (1) » Install
-
Apply pressure upward on the cargo center courtesy lamp (1) to engage the retaining tabs.
-
Connect the electrical connector.
-
Rear Seat Position Center Reading and Courtesy Lamp - Rear (1) » Install
-
Apply pressure upward on the rear seat position center reading and courtesy lamp (1) to engage the retaining tabs.
-
Connect the electrical connector.
-
{ If equipped } Rear Seat Position Center Reading and Courtesy Lamp - Front (1) » Install
-
Apply pressure upward on the rear seat position center reading and courtesy lamp (1) to engage the retaining tabs, if equipped.
- Rear Seat Belt Opening Bezel (2) » Install [2x]
- 3rd Row Seat Belt Guide (1) » Install [2x]
-
Rear Seat Belt Guide Bolt (2) » Install and tighten [2x] — Fastener Specifications
-
3rd Row Seat Belt Guide Cover (1) » Close
-
Feed the 3rd row seat center belt through the rear seat center belt opening bezel (1).
-
Rear Seat Center Belt Opening Bezel - 3rd Row Seat (1) » Install
-
Connect the rear seat belt mini-latch (1).
- Body Rear Corner Upper Garnish Molding (1) » Install
- Body Rear Corner Upper Garnish Molding Bolt (1) » Install and tighten — Fastener Specifications
- Body Side Rear Window Garnish Molding (1) » Install
- Body Lock Pillar Upper Trim Panel (1) » Install
- Quarter Window Trim Finish Panel Bolt (2) » Install and tighten — Fastener Specifications
- Quarter Window Trim Finish Panel Bolt Cap (1) » Install
- Center Pillar Upper Trim Panel (3) » Install
- Center Pillar Upper Garnish Molding Bolt (2) » Install and tighten — Fastener Specifications
- Center Pillar Upper Trim Panel Bolt Cap (1) » Install
- Center Pillar Center Trim Panel (1) » Install
-
Coat Hook (2) » Install [2x]
-
Coat Hook Bolt (1) » Install and tighten [2x] — Fastener Specifications
-
Install the windshield multifunction sensor mount bracket cover (1) ensuring the retaining tabs are fully seated.
-
Windshield Multifunction Sensor Mount Bracket Cover Insert (1) » Install
-
Apply pressure upward on the windshield multifunction sensor mount bracket cover insert (1) to engage the retaining tabs.
-
Connect the electrical connectors.
-
Roof Console (3) » Install
-
Roof Console Bolt (2) » Install and tighten [2x] — Fastener Specifications
-
Roof Console Opening Trim Plate (1) » Install
-
Sunshade Support Bolt (1) » Install and tighten [2x] — Fastener Specifications
-
Close the sunshade support bolt access cover.
-
Connect the electrical connector.
-
Install the retainer that attaches the sunshade (3) to the headliner.
-
Sunshade - Right Side (3) » Install
-
Sunshade Bolt (2) » Install and tighten [3x] — Fastener Specifications
-
Sunshade Retainer Bolt Cover (1) » Install
-
Roof Rail Assist Handle (2) » Install
-
Roof Rail Assist Handle Bolt (1) » Install and tighten [2x] — Fastener Specifications
-
Windshield Garnish Molding - Right Side (3) » Install
-
Windshield Pillar Assist Handle Bolt (2) » Install and tighten [2x] — Fastener Specifications
-
Windshield Pillar Assist Handle Cover (1) » Install [2x]
-
Enable the SIR System. SIR Disabling and Enabling