Air Conditioning Compressor Replacement (L84_L87)
Air Conditioning Compressor Replacement (L84/L87) Single Use Fasteners and Components Air Conditioning Compressor and Condenser Hose Seal - Large Air Conditioning Compressor and Condenser Hose Seal - Small Accessory Drive Primary Belt Accessory Drive Auxiliary Belt Engine Oil Cooler Retainer [2x] Special Tools Engine Mechanical EN-51767-2 Universal Stretchy Belt Installer Equivalent regional tools: Special Tools Removal Procedure
- Recover the refrigerant. Refrigerant Recovery and Recharging
- Disconnect the battery negative cable. Battery Negative Cable Disconnection and Connection
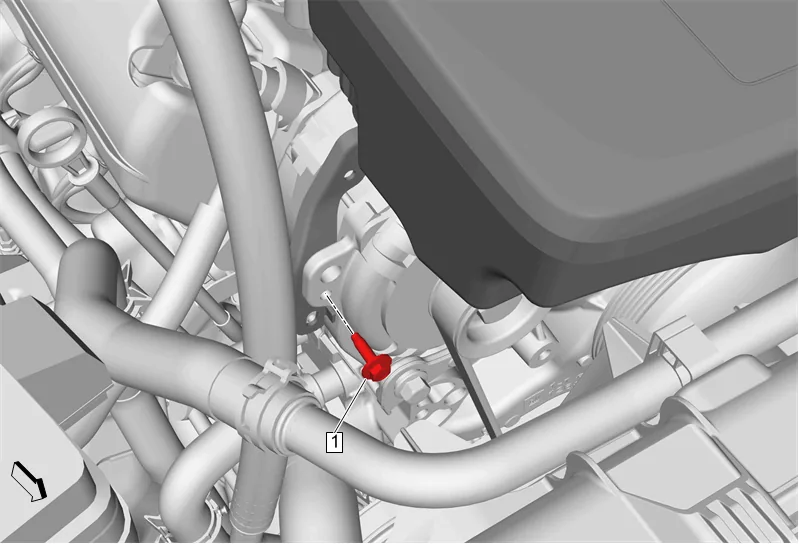
- Air Cleaner Outlet Duct Bracket Bolt (1) » Remove
- Remove the engine wiring harness from the air cleaner outlet duct bracket.
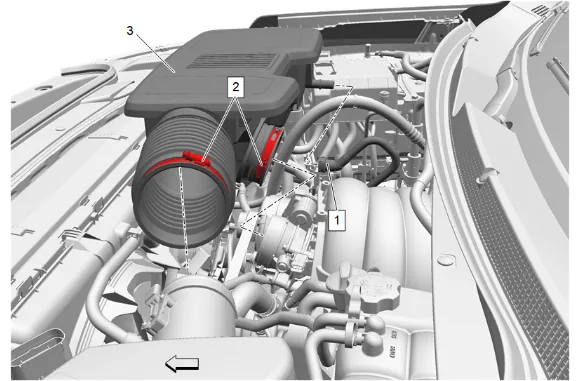
- Positive Crankcase Ventilation Fresh Air Tube (1) » Disconnect — Plastic Collar Quick Connect Fitting Service
- Air Cleaner Outlet Duct Clamp (2) » Loosen [2x]
- Air Cleaner Outlet Duct (3) » Remove
- Raise and support the vehicle. Lifting and Jacking the Vehicle
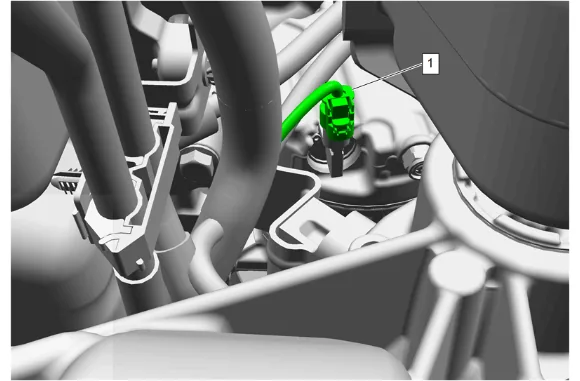
- Electrical Connector (1) @ Air Conditioning Compressor » Disconnect
- Lower the vehicle.
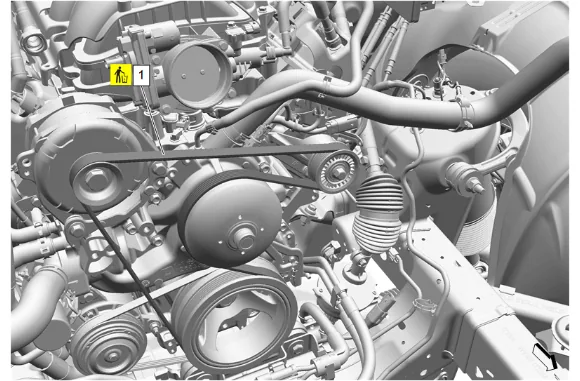
- Using a suitable tool, cut the accessory drive primary belt (1).
- Accessory Drive Primary Belt (1) » Remove and DISCARD
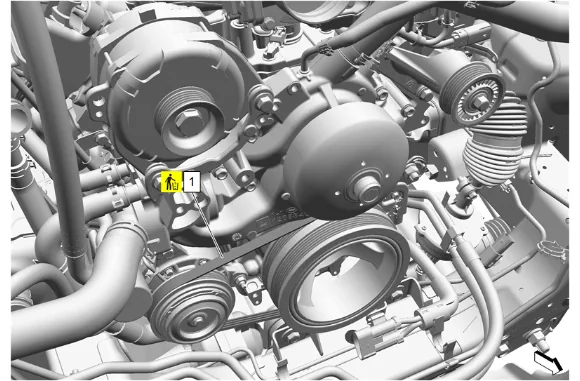
- Using a suitable tool, cut the accessory drive auxiliary belt (1).
- Accessory Drive Auxiliary Belt (1) » Remove and DISCARD
- Drain the cooling system. Cooling System Draining and Filling
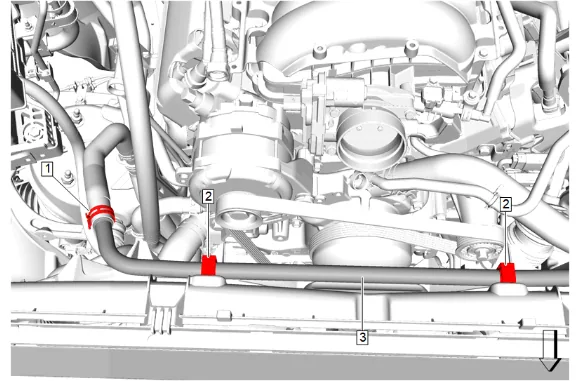
- Radiator Surge Tank Outlet Hose Clip (2) » Remove [2x]
- Radiator Surge Tank Outlet Hose (3) » Position aside
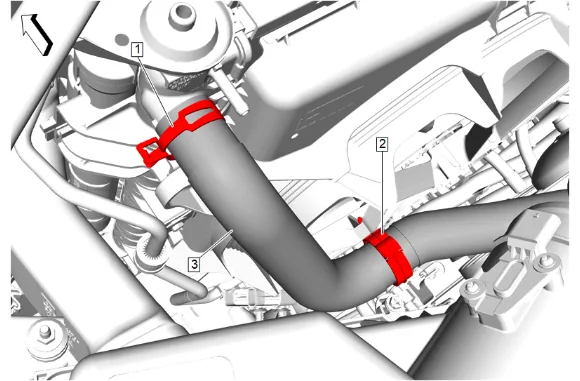
- Radiator Inlet Hose Clip (2) » Remove
- Radiator Inlet Hose Clamp (1) » Disengage — Hose Clamp Replacement Guidelines - Spring Type
- Radiator Inlet Hose (3) @ Engine Radiator » Remove and position aside
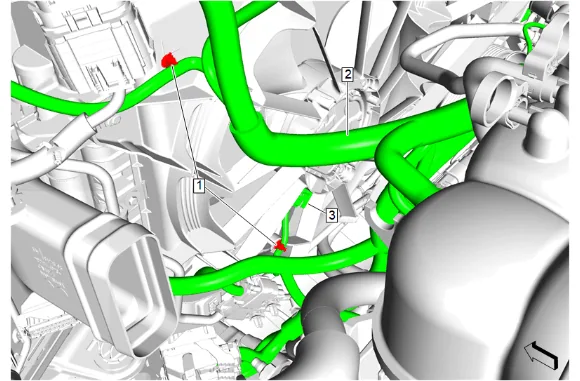
- Wiring Harness Retainer (1) » Remove [2x]
- Electrical Connector (3) » Disconnect
- Wiring Harness (2) » Position aside
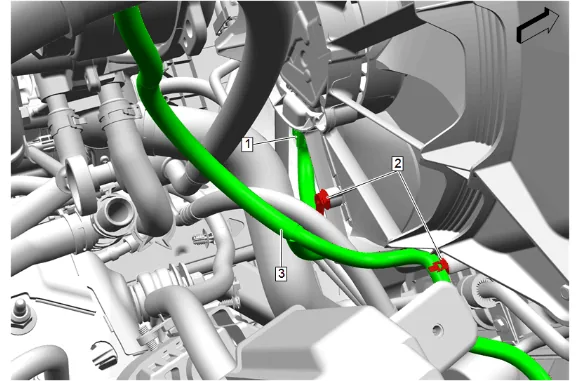
- Wiring Harness Retainer (2) » Remove [2x]
- Electrical Connector (1) » Disconnect
- Wiring Harness (3) » Position aside
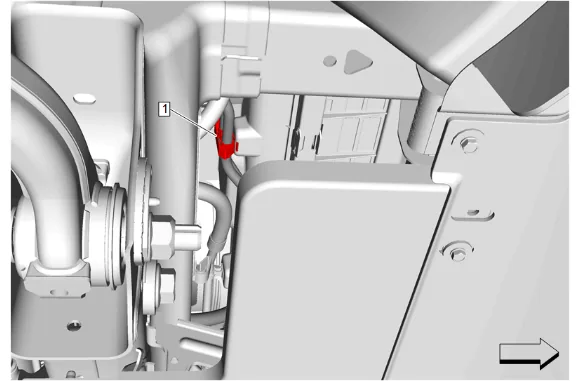
- Engine Oil Cooler Hose Clip (1) » Release
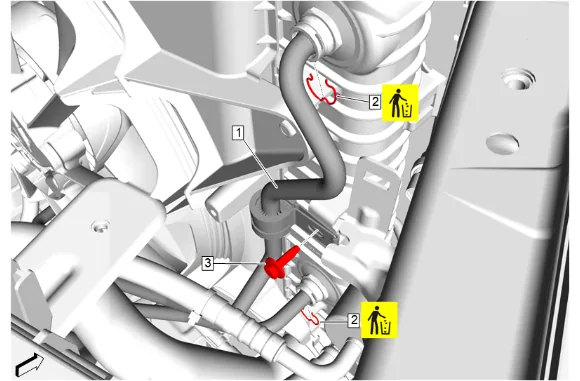
- Engine Oil Cooler Retainer (2) » Remove and DISCARD [2x]
- Engine Oil Cooler Pipe Bracket Bolt (3) » Remove
- Engine Oil Cooler Hose (1) @ Engine Radiator » Remove [2x]
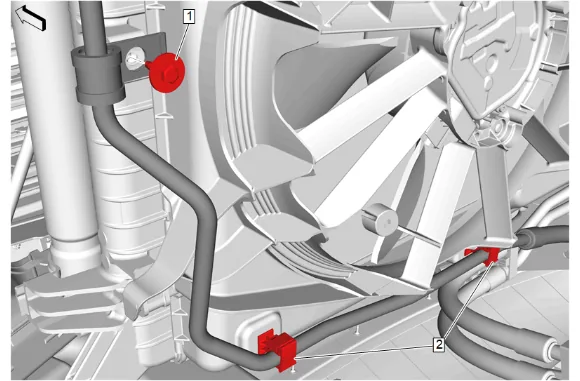
- Transmission Fluid Cooler Pipe Bolt (1) » Remove
- Transmission Fluid Cooler Pipe Clip (2) » Remove [2x]
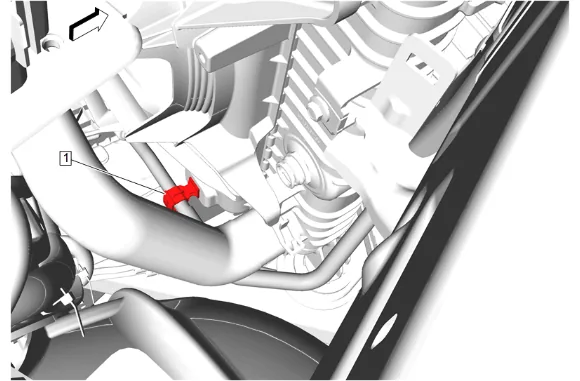
- Transmission Fluid Cooler Pipe Clip (1) » Release
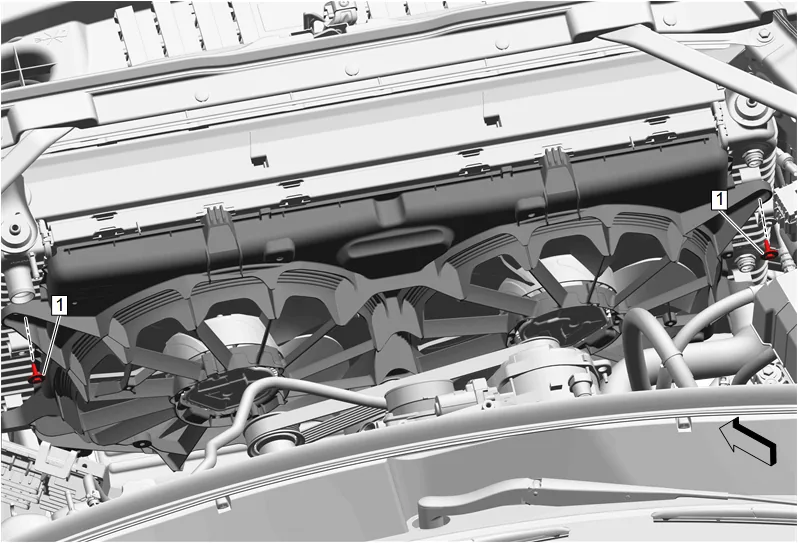
- Engine Coolant Fan Bracket Bolt (1) » Remove [2x]
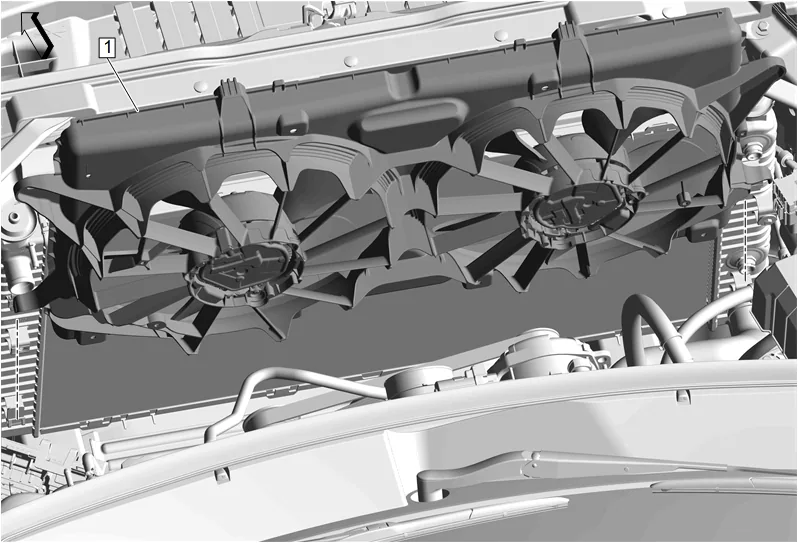
- Engine Cooler Fan (1) @ Engine Radiator » Remove
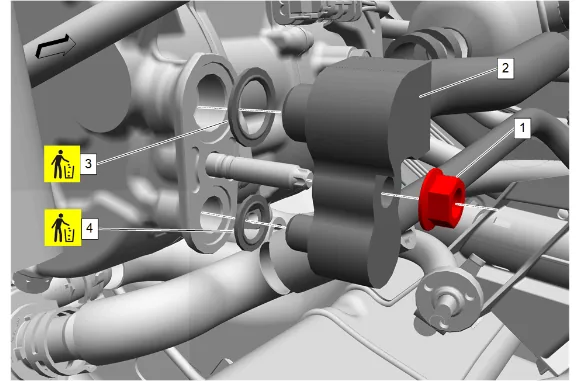
- Air Conditioning Compressor and Condenser Hose Nut (1) » Remove
- Air Conditioning Compressor and Condenser Hose (2) » Remove
- Air Conditioning Compressor and Condenser Hose Seal - Small (4) » Remove and DISCARD
- Air Conditioning Compressor and Condenser Hose Seal - Large (3) » Remove and DISCARD
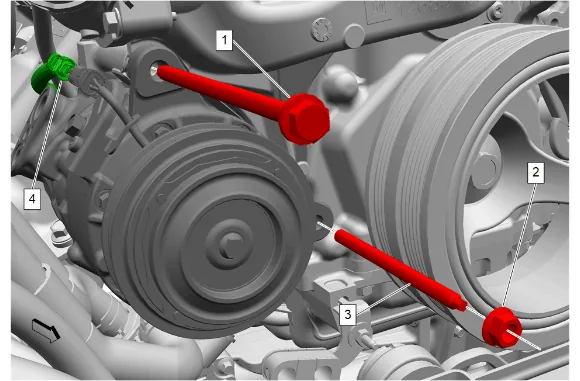
- Air Conditioning Compressor Bolt (1) » Remove
- Air Conditioning Compressor Nut (2) » Remove
- Air Conditioning Compressor Stud (3) » Remove
- Disconnect the electrical connector. (4)
-
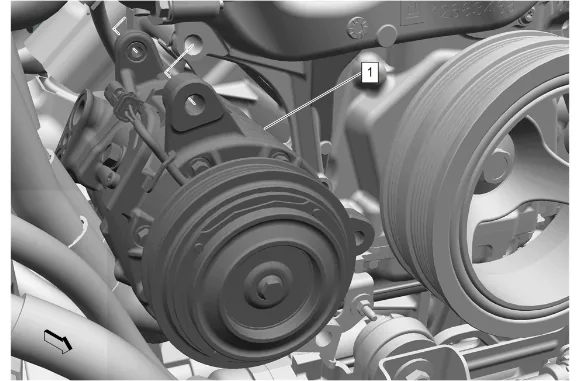
Air Conditioning Compressor (1) » Remove Installation Procedure
-
Prior to installing the air conditioning compressor perform the air conditioning compressor oil balancing procedure. Air Conditioning Compressor Oil Balancing
-
Air Conditioning Compressor (1) » Install
-
Air Conditioning Compressor Bolt (1) » Loosely install
-
Air Conditioning Compressor Stud (3) » Install and tighten — Fastener Specifications
-
Air Conditioning Compressor Bolt (1) » Tighten — Fastener Specifications
-
Air Conditioning Compressor Nut (2) » Install and tighten — Fastener Specifications
-
Connect the electrical connector. (4)
-
Raise and support the vehicle.
-
Electrical Connector (1) @ Air Conditioning Compressor » Connect
-
Remove the support and lower the vehicle.
- Air Conditioning Compressor and Condenser Hose Seal - Small (4) » Install NEW
- Air Conditioning Compressor and Condenser Hose Seal - Large (3) » Install NEW
- Air Conditioning Compressor and Condenser Hose (2) » Install
- Air Conditioning Compressor and Condenser Hose Nut (1) » Install and tighten — Fastener Specifications
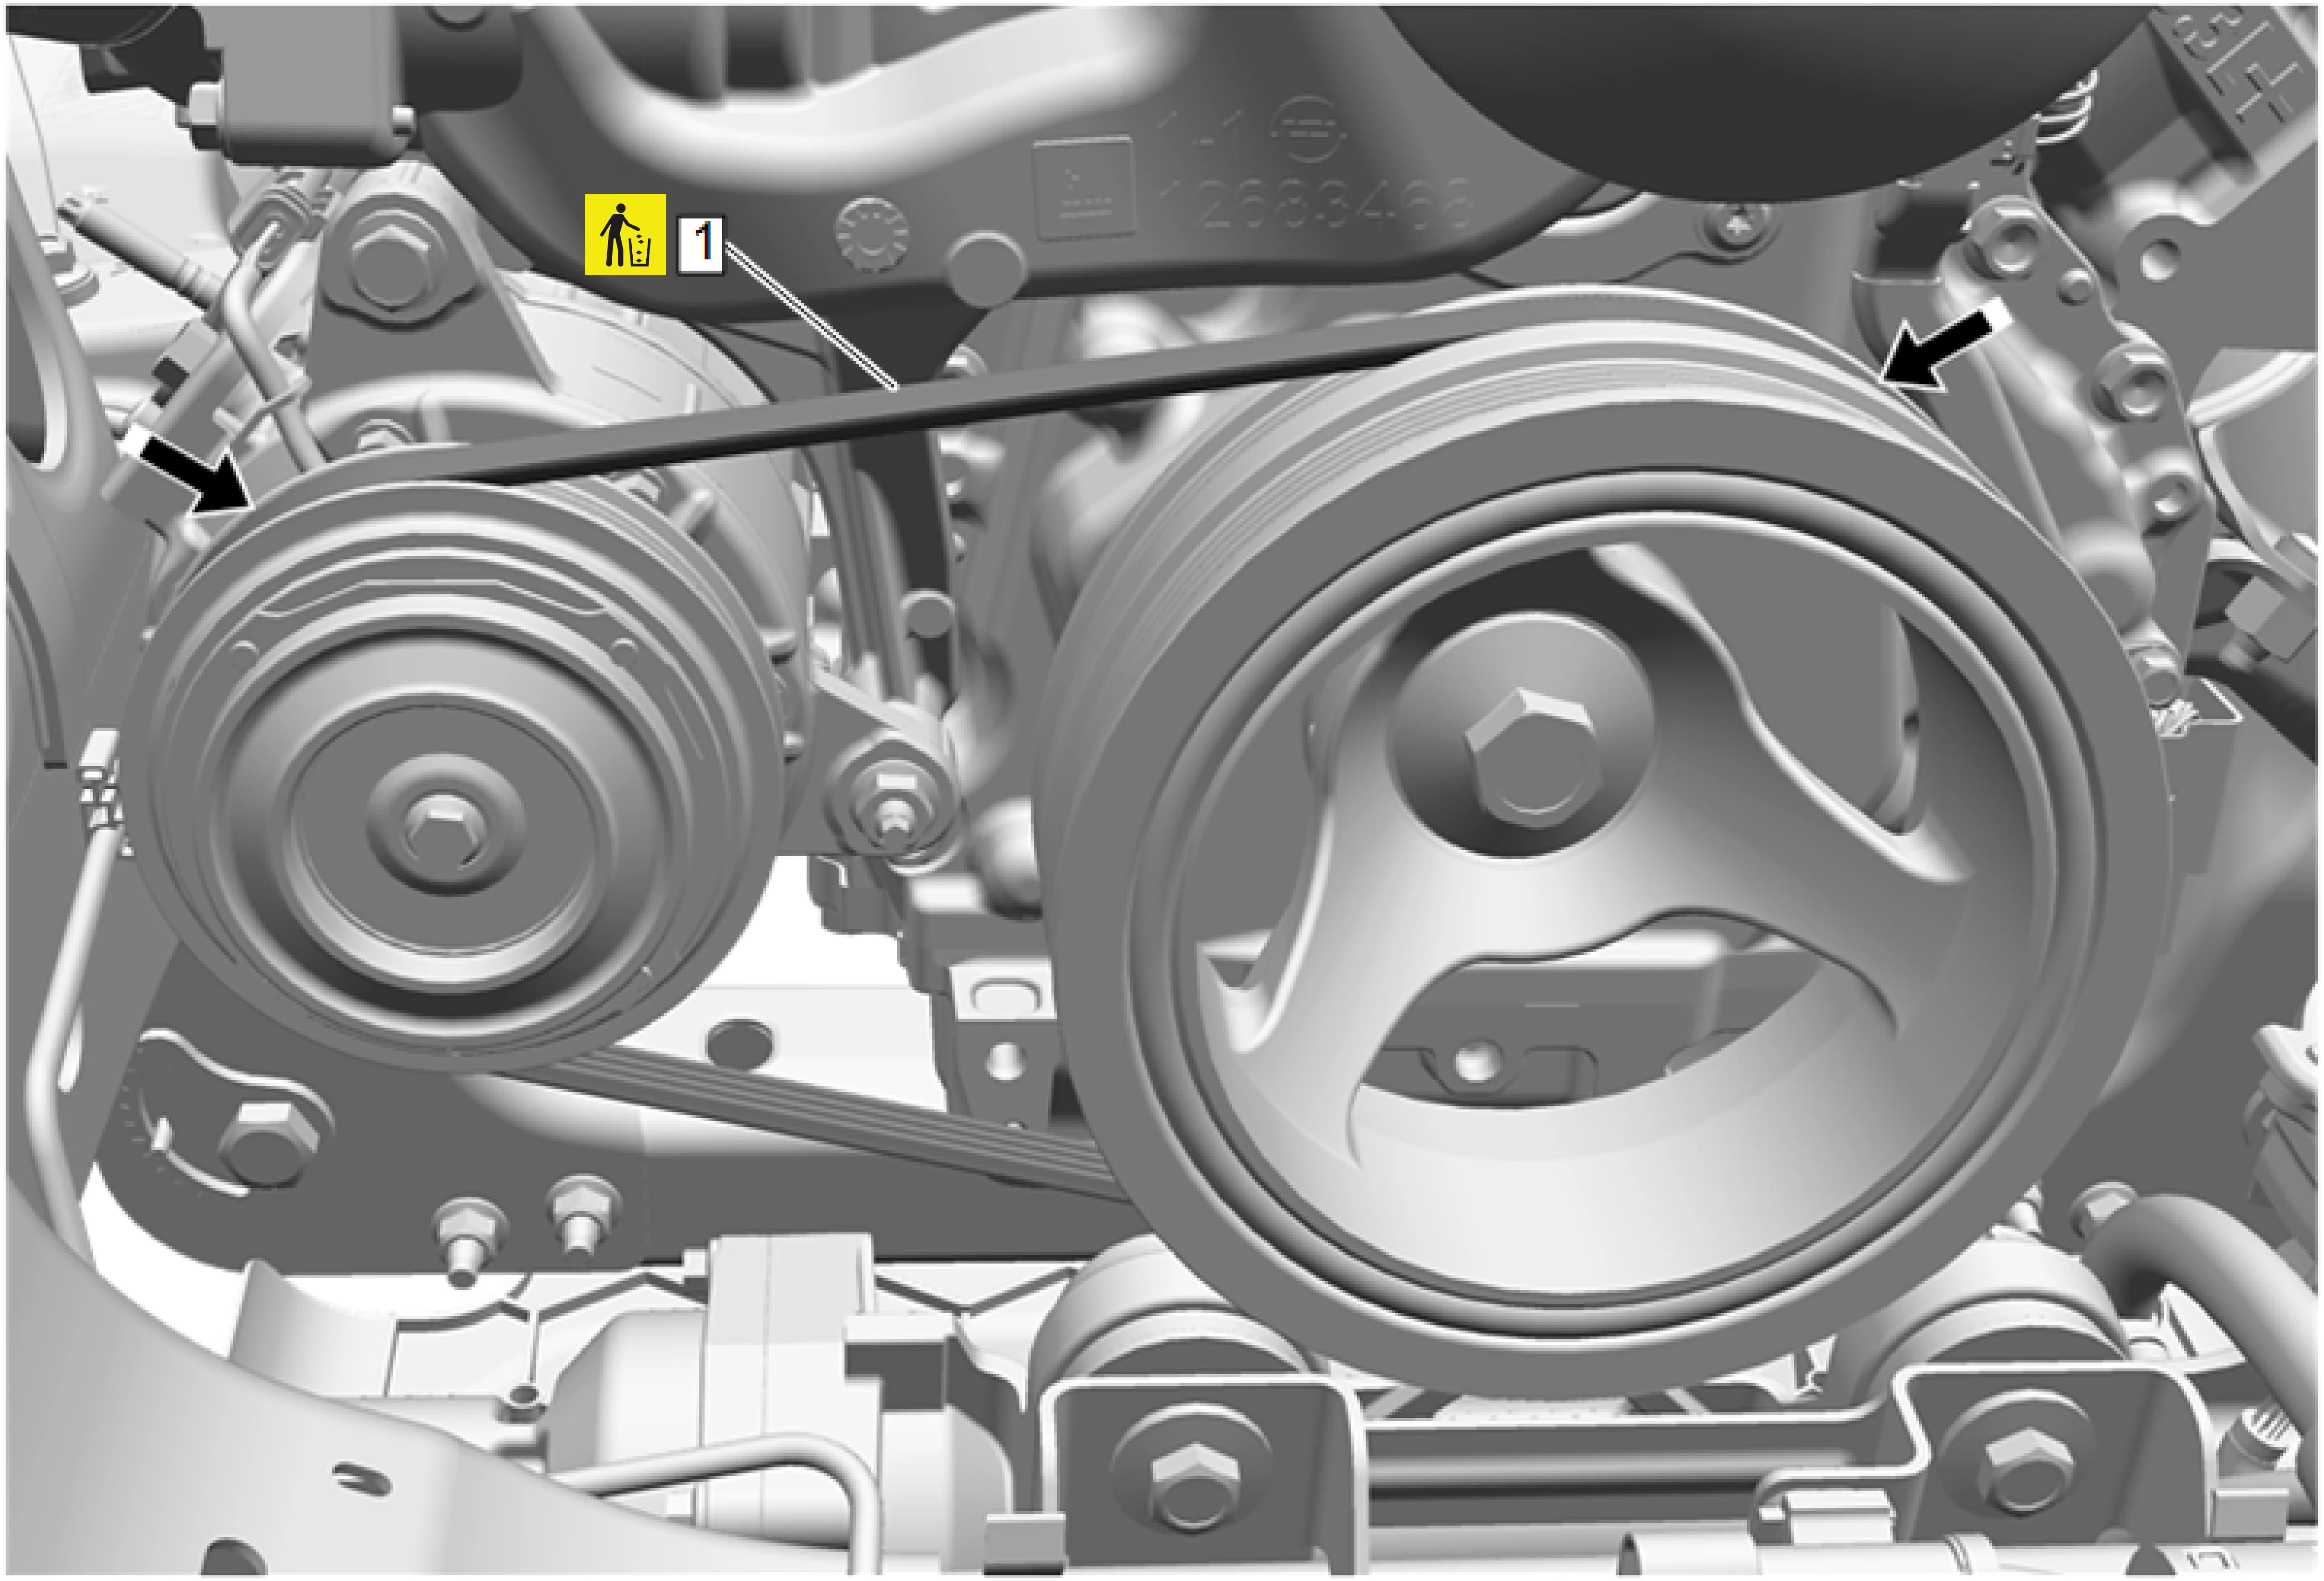
- Install the air conditioning belt following the instructions included with the belt.
- Inspect the belt (1) for proper installation and alignment.
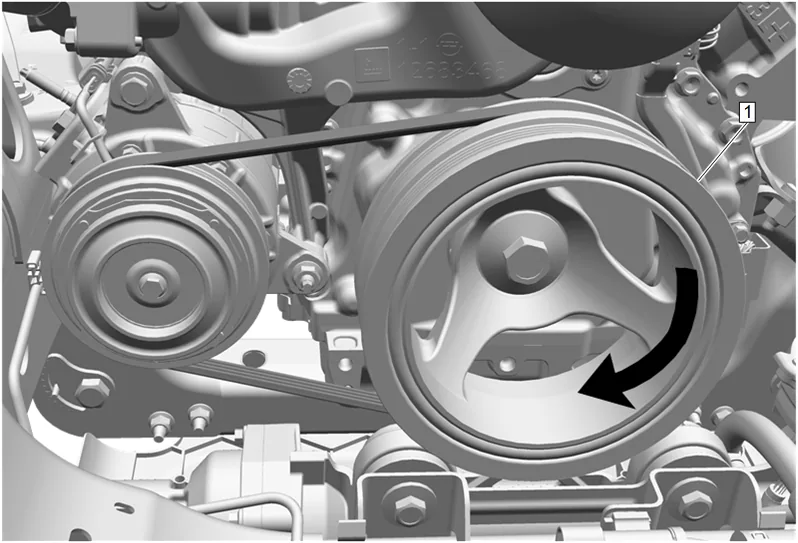
- Rotate the balancer (1) an additional 360 degrees to ensure proper belt installation.
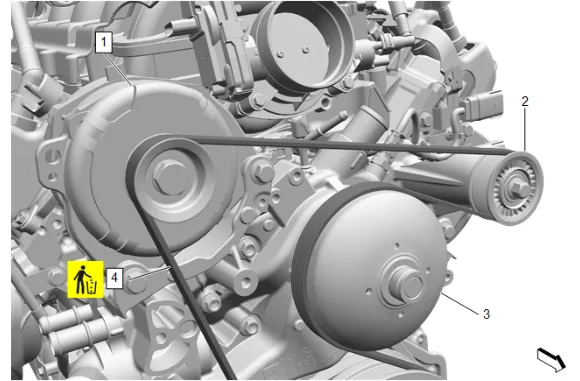
- Position the accessory drive primary belt (4) on the belt idler pulley (2), fan and water pump pulley (3) and generator (1).
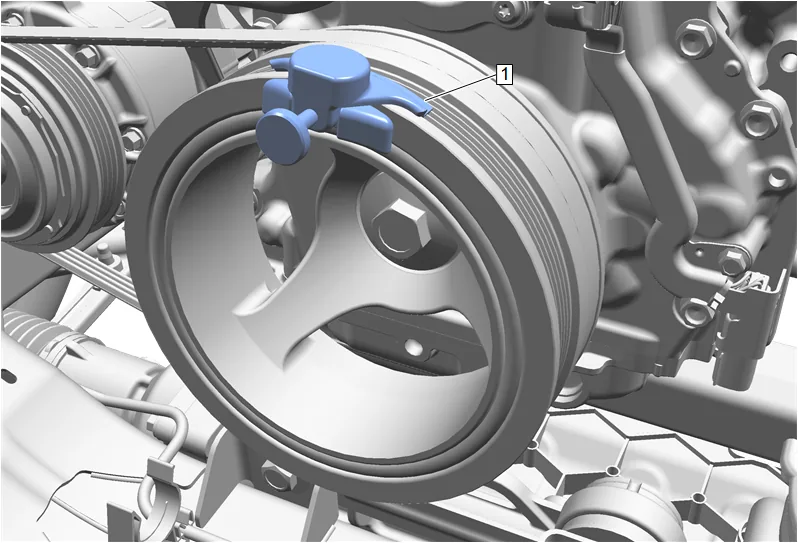
- Install EN-51767-2 Universal Stretchy Belt Installer (1) onto the crankshaft balancer.
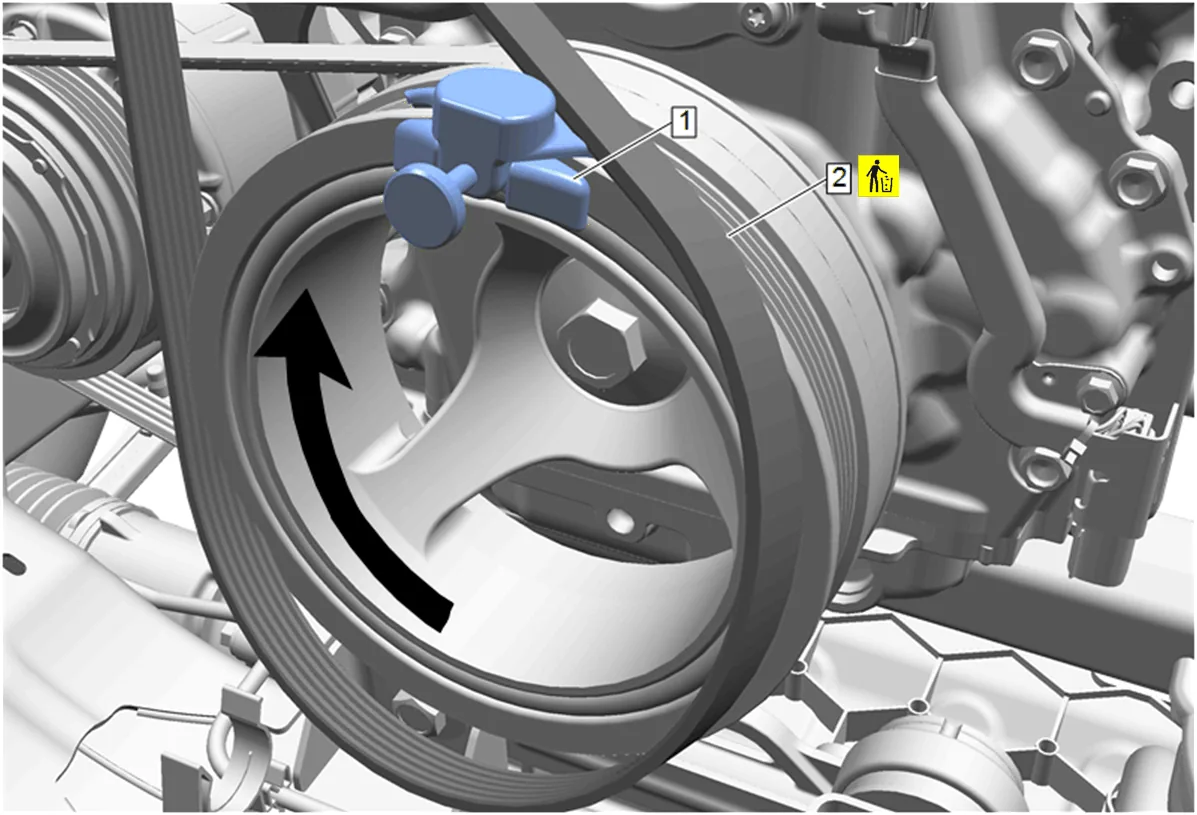
- Position the accessory drive primary belt (2) on the crankshaft balancer.
- Slowly rotate the crankshaft balancer in a clockwise direction until the accessory drive primary belt (2) fully seats on the crankshaft balancer.
- Remove EN-51767-2 Universal Stretchy Belt Installer (1) from the crankshaft balancer.
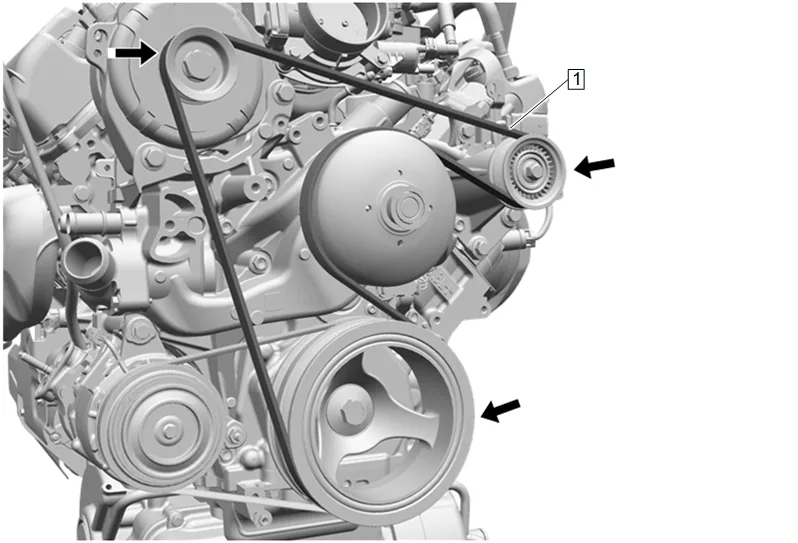
- Inspect the accessory drive primary belt (1) for proper installation and alignment.
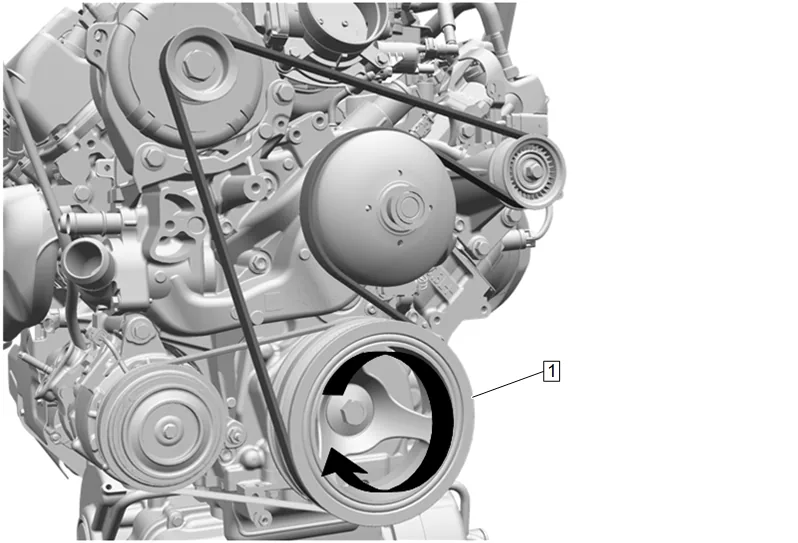
-
Rotate the crankshaft balancer (1) and additional 360 degrees to ensure proper accessory drive primary belt installation.
-
Engine Cooler Fan (1) @ Engine Radiator » Install
-
Engine Coolant Fan Bracket Bolt (1) » Install and tighten [2x] — Fastener Specifications
-
Transmission Fluid Cooler Pipe Clip (1) » Secure
-
Transmission Fluid Cooler Pipe Clip (2) » Install [2x]
-
Transmission Fluid Cooler Pipe Bolt (1) » Install and tighten — Fastener Specifications
-
Engine Oil Cooler Hose (1) @ Engine Radiator » Install [2x]
-
Engine Oil Cooler Pipe Bracket Bolt (3) » Install and tighten — Fastener Specifications
-
Engine Oil Cooler Retainer (2) » Install NEW [2x]
-
Engine Oil Cooler Hose Clip (1) » Secure
- Position the wiring harness. (3)
- Electrical Connector (1) » Connect
- Wiring Harness Retainer (2) » Install [2x]
- Position the wiring harness. (2)
- Electrical Connector (3) » Connect
- Wiring Harness Retainer (1) » Install [2x]
-
Radiator Inlet Hose (3) @ Engine Radiator » Install
-
Radiator Inlet Hose Clamp (1) » Engage — Hose Clamp Replacement Guidelines - Spring Type
-
Radiator Inlet Hose Clip (2) » Install
-
Radiator Surge Tank Outlet Hose (3) » Move into position
-
Radiator Surge Tank Outlet Hose Clip (2) » Install [2x]
-
Air Cleaner Outlet Duct (3) » Install
-
Air Cleaner Outlet Duct Clamp (2) » Tighten [2x] — Fastener Specifications
-
Positive Crankcase Ventilation Fresh Air Tube (1) » Connect — Plastic Collar Quick Connect Fitting Service
-
Air Cleaner Outlet Duct Bracket Bolt (1) » Install and tighten — Fastener Specifications
-
Install the engine wiring harness to the air cleaner outlet duct bracket.
-
Connect the battery negative cable. Battery Negative Cable Disconnection and Connection
-
Fill the cooling system. Cooling System Draining and Filling
-
Recharge the refrigerant. Refrigerant Recovery and Recharging
-
Inspect for refrigerant leaks. Leak Testing
-
Start the engine and check for coolant leaks.