Heater and Air Conditioning Evaporator and Blower Module Removal and Installation
Heater and Air Conditioning Evaporator and Blower Module Removal and Installation Single Use Fasteners and Components Air Conditioning Evaporator Thermal Expansion Valve Seal - Large [2x] Air Conditioning Evaporator Thermal Expansion Valve Seal - Small [2x] Special Tool Wipers and Washers J-39822 Wiper Arm Puller Equivalent regional tools: Special Tools Removal Procedure
- Disconnect the negative battery cable. Battery Negative Cable Disconnection and Connection
- Recover the refrigerant. Refrigerant Recovery and Recharging
- Drain the coolant. Cooling System Draining and Filling
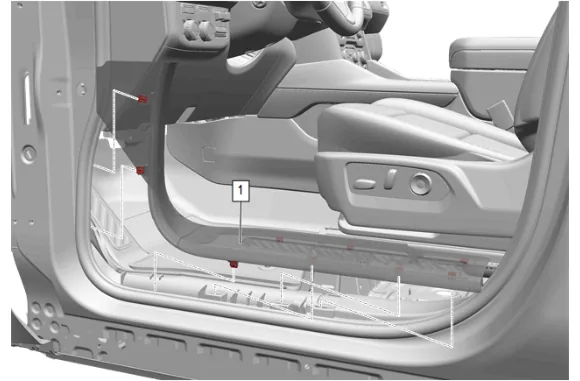
- Starting at the rear of the right front side door sill garnish molding (1) pull upward at the B- pillar joint to disengage the garnish molding.
- Work your way forward disengaging all the right front side door sill garnish molding retaining clips and then pull rearward to disengage the 2 retaining clips on the forward vertical wall.
- Front Side Door Sill Garnish Molding - Right Side (1) » Remove
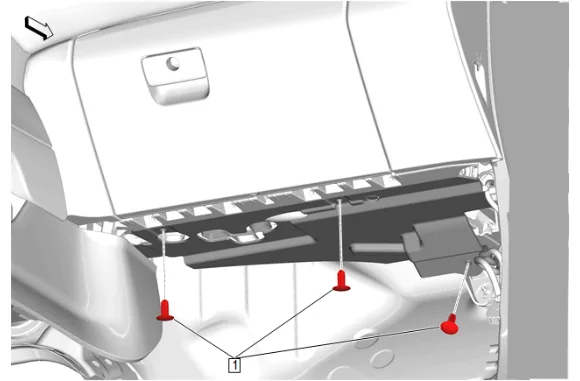
- Instrument Panel Lower Insulator Retainer (1) » Remove [3x]
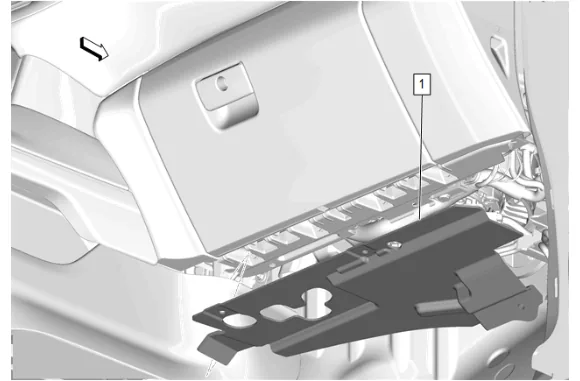
- Instrument Panel Lower Trim Panel Insulator (1) » Remove
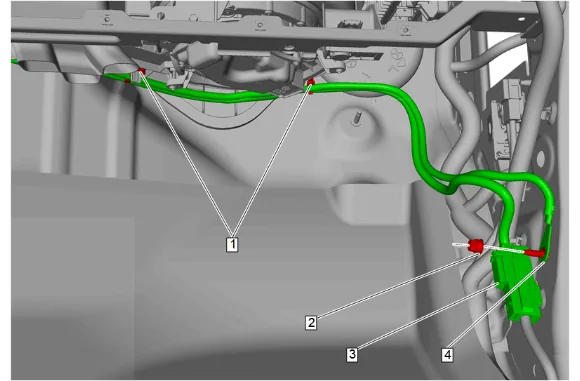
- {with C3A} Ground Nut (2) » Remove 9.1. Disconnect the electrical connector. (3) 9.2. Ground terminal (4) » Remove
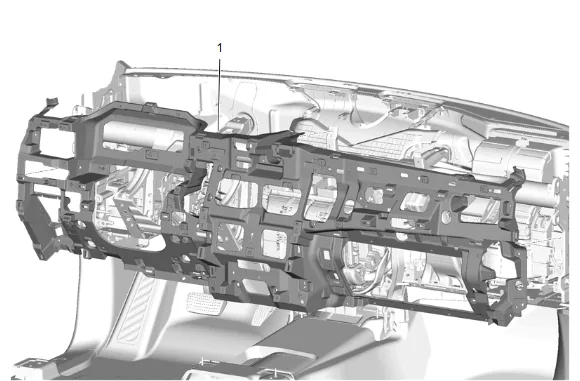
- Instrument Panel Carrier (1) » Remove — Instrument Panel Carrier Replacement
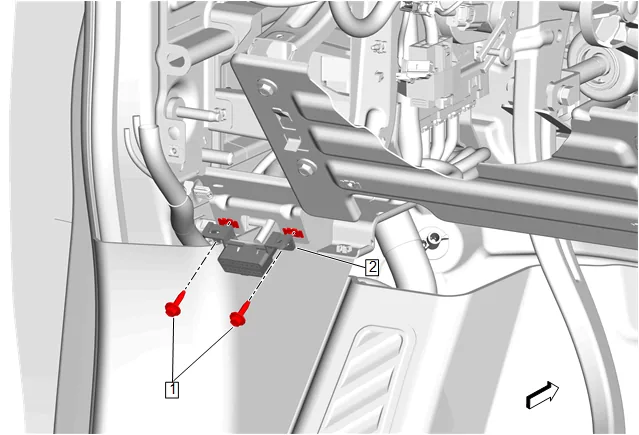
- Data Link Connector Bolt (1) » Remove [2x]
- Data Link Connector (2) » Reposition away
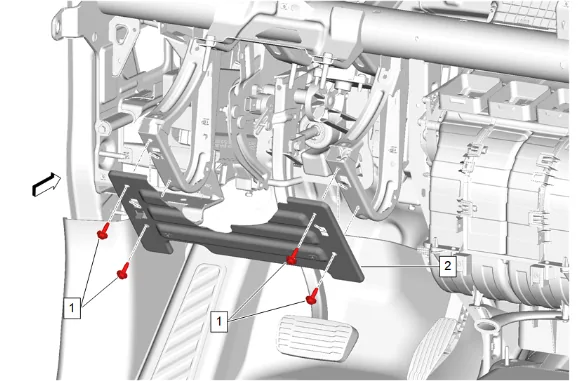
- Instrument Panel Driver Knee Bolster Brace Bolt (1) » Remove [4x]
- Instrument Panel Knee Bolster Deflector (2) » Remove
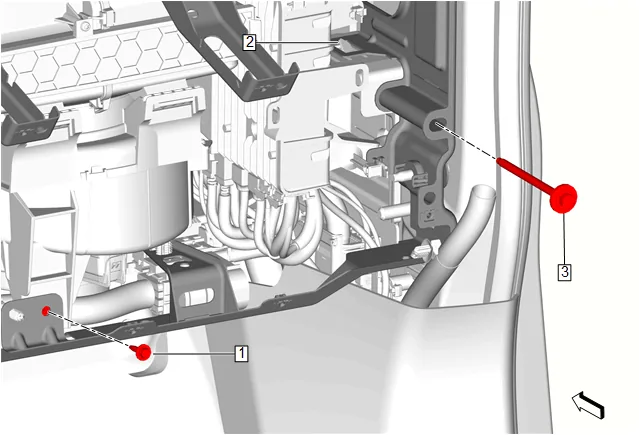
- Heater and Air Conditioning Evaporator and Blower Module Bolt (1) » Remove
- Use a suitable tool to push the tab (2) down.
- Instrument Panel Tie Bar Bolt (3) » Remove
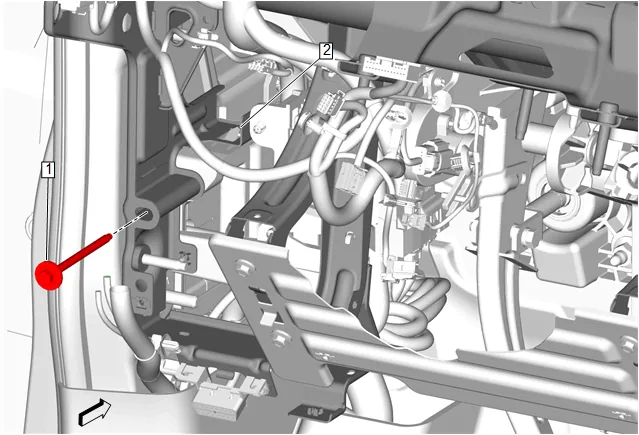
- Instrument Panel Tie Bar Bolt (1) » Remove
- Use a suitable tool to push the tab (2) down.
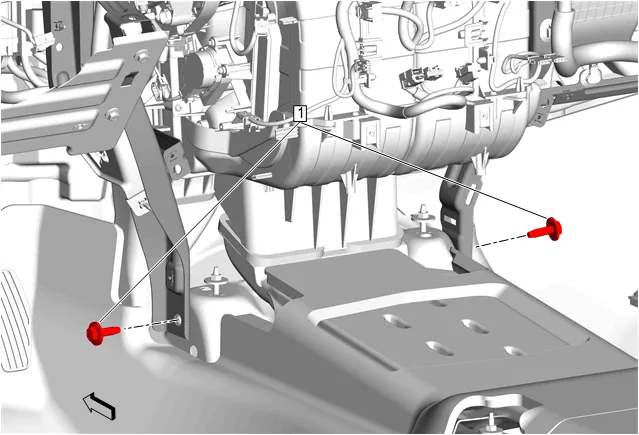
- Instrument Panel Tie Bar Bolt (1) @ Floor Panel Tunnel Panel » Remove [2x]
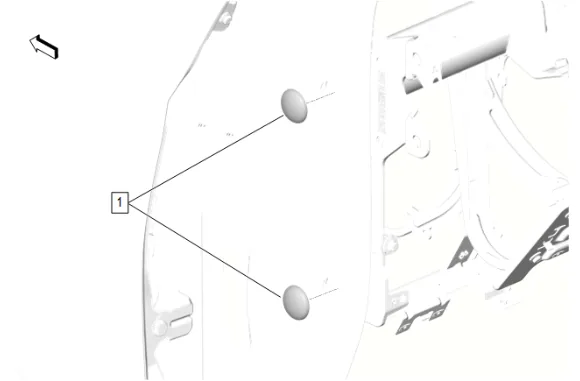
- Body Hinge Pillar Outer Panel Hole Plug (1) » Remove [2x]
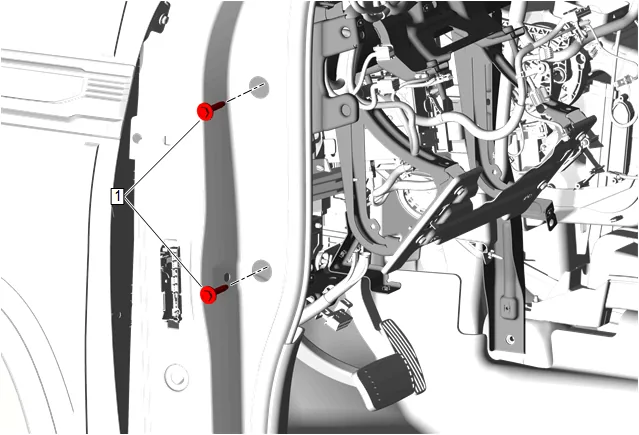
- Instrument Panel Tie Bar Bolt (1) @ Front Side Door » Remove [2x]
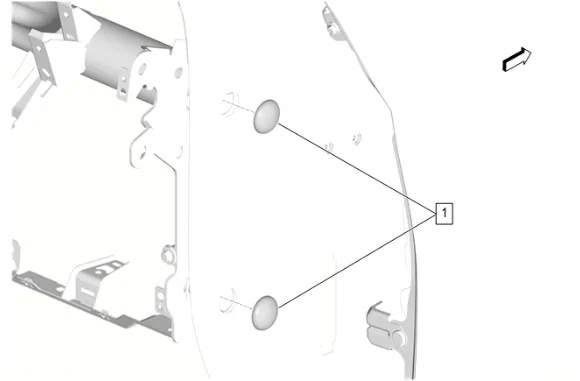
- Body Hinge Pillar Outer Panel Hole Plug (1) » Remove [2x]
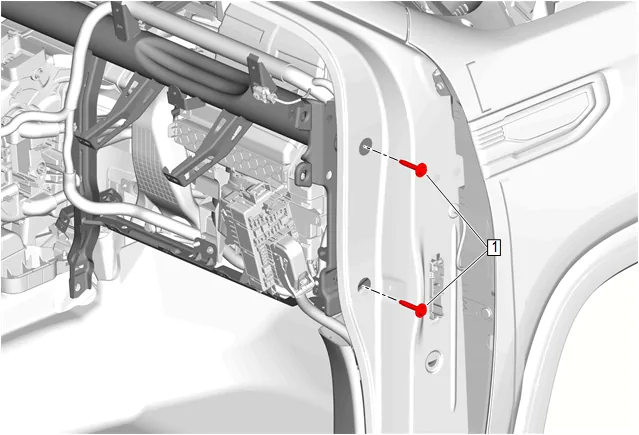
- Instrument Panel Tie Bar Bolt (1) @ Front Side Door » Remove [2x]
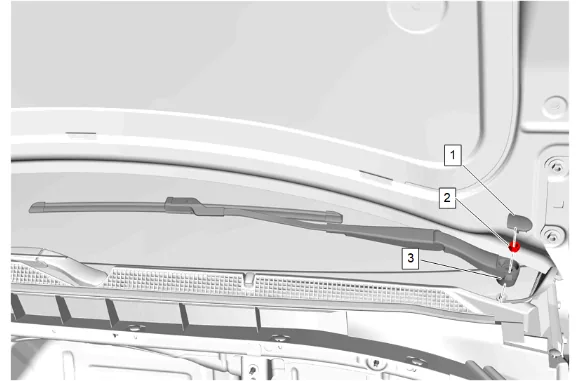
- Using the appropriate trim tool, remove the 2 windshield wiper arm finish caps (1) from both windshield wiper arms (3).
- Windshield Wiper Arm Nut (2) » Remove [2x]
- Use the J-39822 Wiper Arm Puller to remove the windshield wiper arms (3) from the left and right side windshield wiper transmission pivot shaft.
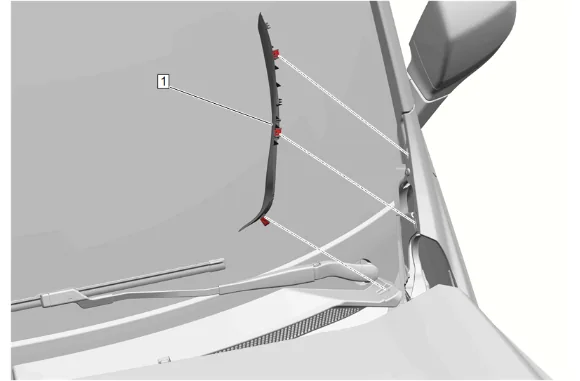
- Apply two layers of masking tape to the painted surface around the top edge of the air inlet grille panel extensions (1) to prevent paint damage.
- Using a suitable plastic trim tool, carefully release the air inlet grille panel extension clips.
- Air Inlet Grille Panel Extension (1) » Remove [2x]
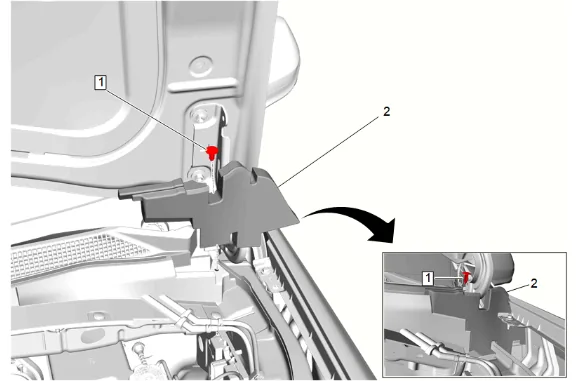
- Hood Rear Outer Air Inlet Seal Retainer (1) » Remove [2x]
- Hood Rear Outer Air Inlet Seal (2) » Remove [2x]
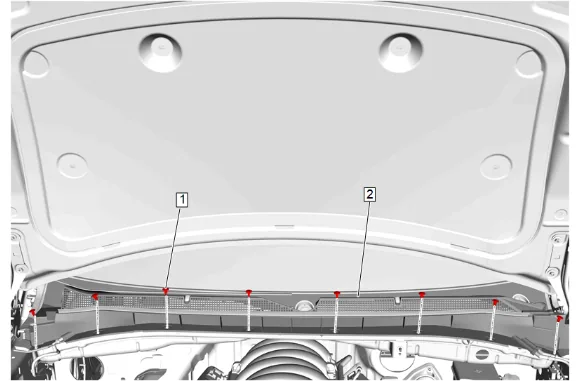
- Air Inlet Grille Panel Retainer (1) » Remove [8x]
- Windshield Washer Nozzle Hose » Disconnect [3x]
- Lift the front edge of the air inlet grille panel (2) and slide the panel forward from both hood hinges to remove.
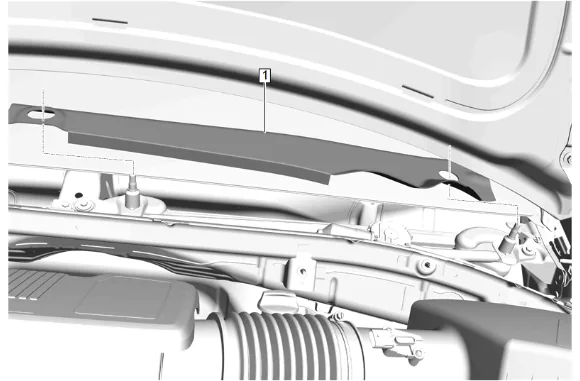
- Windshield Wiper System Module Shield (1) » Remove
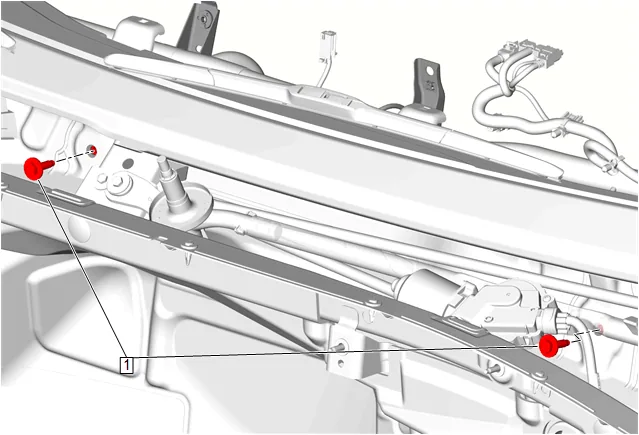
- Instrument Panel Tie Bar Bolt (1) @ Plenum Lower Panel » Remove [2x]
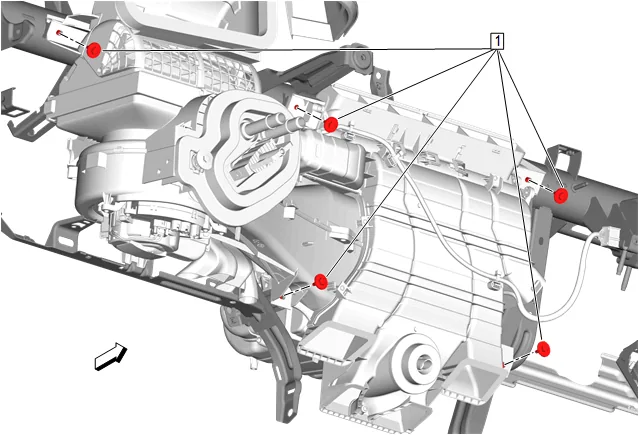
- Heater and Air Conditioning Evaporator and Blower Module Bolt (1) @ Heater and Air Conditioning Evaporator and Blower Module » Remove [5x]
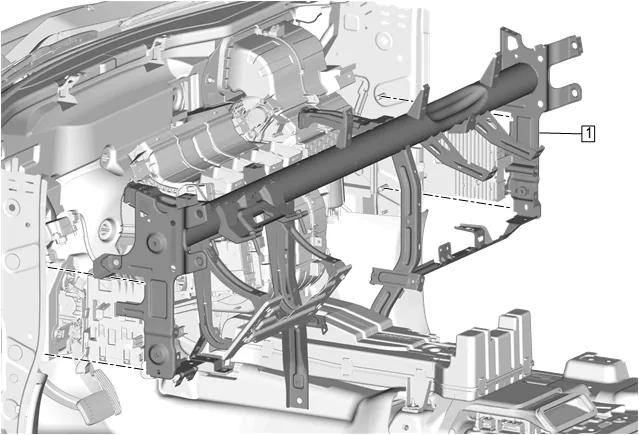
- Disconnect the wiring harness from the instrument panel tie bar assembly (1) as necessary.
- Instrument Panel Tie Bar (1) » Remove
- Support the heater and air conditioning evaporator and blower module.
- With the aid of an assistant, remove the instrument panel tie bar assembly from the vehicle. (1)
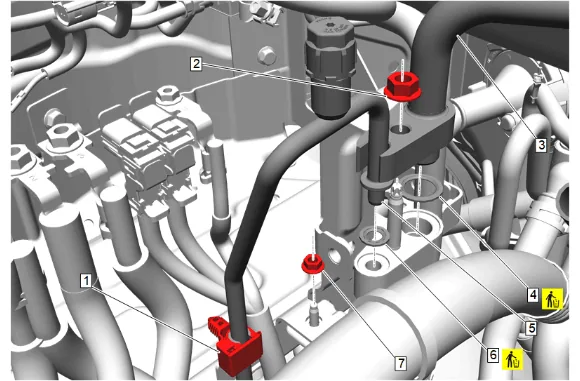
- Air Conditioning Condenser and Evaporator Hose Clip (1) @ Battery Tray » Remove
- Air Conditioning Compressor and Condenser Hose Nut (2) » Remove
- Air Conditioning Compressor and Condenser Hose (3) » Remove
- Air Conditioning Evaporator Thermal Expansion Valve Seal - Large (4) » Remove and DISCARD
- Air Conditioning Condenser and Evaporator Hose (5) » Remove
- Air Conditioning Evaporator Thermal Expansion Valve Seal - Small (6) » Remove and DISCARD
- Air Conditioning Refrigerant Heat Exchanger Nut (7) » Remove
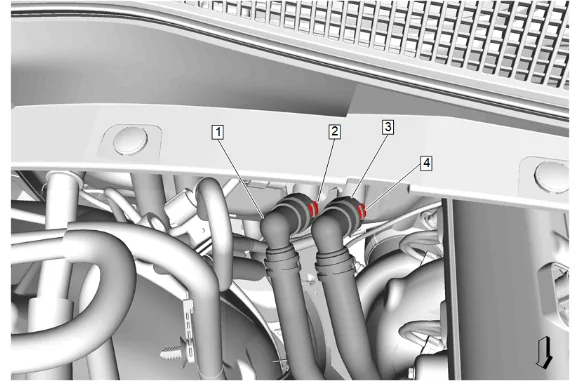
- Heater Outlet Hose Retainer (2) » Disengage
- Heater Outlet Hose (1) » Remove
- Heater Outlet Hose Retainer (4) » Disengage
- Heater Inlet Hose (3) » Remove
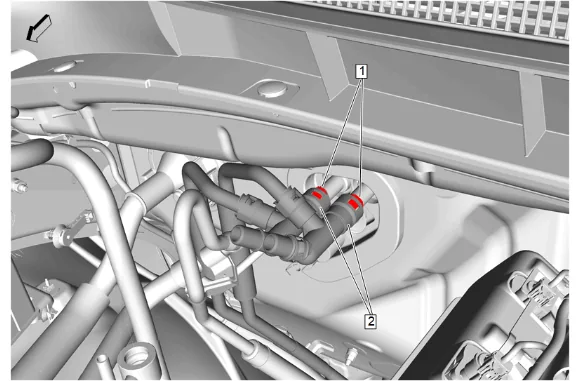
- Retainer (1) » Disengage [2x]
- Auxiliary Heater Inlet and Outlet Hose (2) @ Heater Core » Remove [2x]
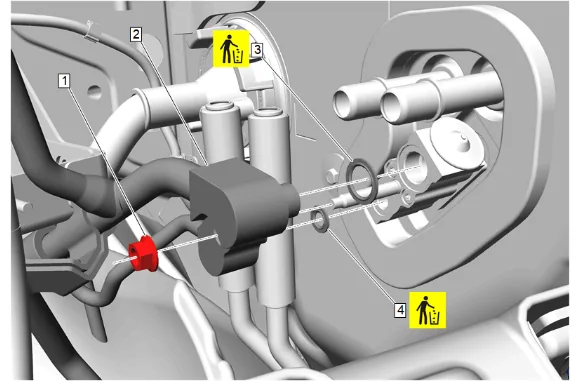
- Air Conditioning Evaporator Thermal Expansion Valve Hose Nut (1) » Remove
- Air Conditioning Refrigerant Heat Exchanger (2) » Remove
- Air Conditioning Evaporator Thermal Expansion Valve Seal - Large (3) » Remove and DISCARD
- Air Conditioning Evaporator Thermal Expansion Valve Seal - Small (4) » Remove and DISCARD
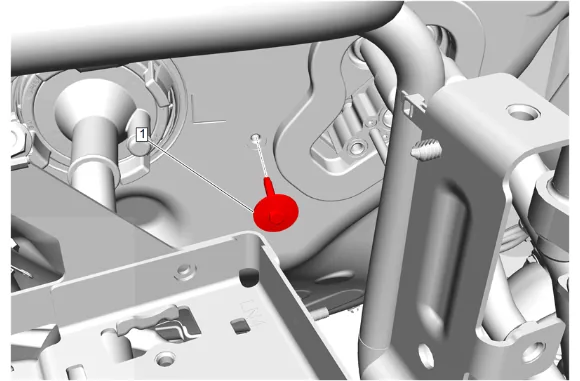
- Heater and Air Conditioning Evaporator and Blower Module Bolt (1) @ Dash Panel » Remove
-
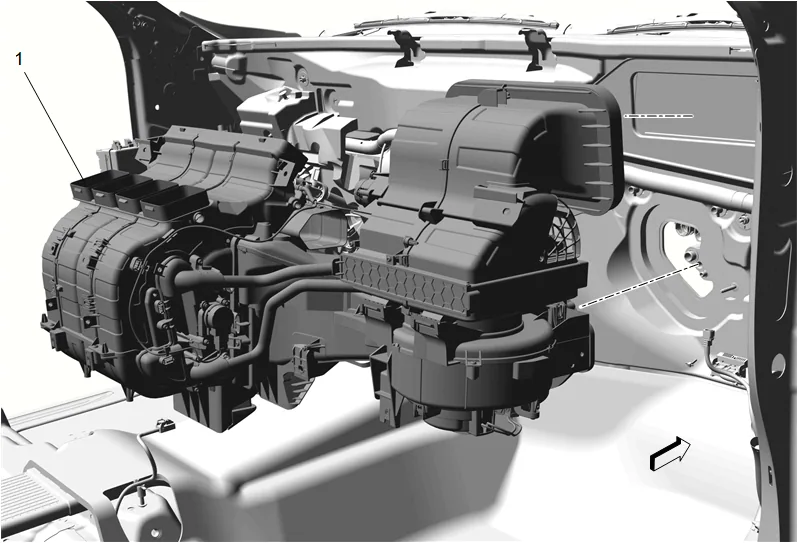
Heater and Air Conditioning Evaporator and Blower Module (1) » Remove
-
With aid of an assistant remove the heater and air conditioning evaporator and blower module (1) from the vehicle. Installation Procedure
-
With aid of an assistant install the heater and air conditioning evaporator and blower module (1) onto the vehicle.
-
Heater and Air Conditioning Evaporator and Blower Module (1) » Install
-
Support the heater and air conditioning evaporator and blower module.
-
Heater and Air Conditioning Evaporator and Blower Module Bolt (1) @ Dash Panel » Install and tighten — Fastener Specifications
-
Air Conditioning Evaporator Thermal Expansion Valve Seal - Small (4) » Install NEW
-
Air Conditioning Evaporator Thermal Expansion Valve Seal - Large (3) » Install NEW
-
Air Conditioning Refrigerant Heat Exchanger (2) » Install
-
Air Conditioning Evaporator Thermal Expansion Valve Hose Nut (1) » Install and tighten — Fastener Specifications
-
Auxiliary Heater Inlet and Outlet Hose (2) @ Heater Core » Install [2x]
-
Retainer (1) » Engage [2x]
-
Heater Inlet Hose (3) » Install
-
Heater Outlet Hose Retainer (4) » Engage
-
Heater Outlet Hose (1) » Install
-
Heater Outlet Hose Retainer (2) » Engage
-
Air Conditioning Refrigerant Heat Exchanger Nut (7) » Install and tighten — Fastener Specifications
-
Air Conditioning Evaporator Thermal Expansion Valve Seal - Small (6) » Install NEW
-
Air Conditioning Condenser and Evaporator Hose (5) » Install
-
Air Conditioning Evaporator Thermal Expansion Valve Seal - Large (4) » Install NEW
-
Air Conditioning Compressor and Condenser Hose (3) » Install
-
Air Conditioning Compressor and Condenser Hose Nut (2) » Install and tighten — Fastener Specifications
-
Air Conditioning Condenser and Evaporator Hose Clip (1) @ Battery Tray » Install
-
With the aid of an assistant, position the instrument panel tie bar assembly into the vehicle.
-
Instrument Panel Tie Bar (1) » Install
-
Attach the wiring harness and connect the electrical connectors as necessary.
-
Remove the support supporting the heater and air conditioning evaporator and blower module.
-
Heater and Air Conditioning Evaporator and Blower Module Bolt (1) @ Heater and Air Conditioning Evaporator and Blower Module » Install and tighten [5x] — Fastener Specifications
-
Instrument Panel Tie Bar Bolt (1) @ Plenum Lower Panel » Install and tighten [2x] — Fastener Specifications
- Instrument Panel Tie Bar Bolt (1) @ Front Side Door » Install and tighten [2x] — Fastener Specifications
- Body Hinge Pillar Outer Panel Hole Plug (1) » Install [2x]
- Instrument Panel Tie Bar Bolt (1) @ Front Side Door » Install and tighten [2x] — Fastener Specifications
-
Body Hinge Pillar Outer Panel Hole Plug (1) » Install [2x]
-
Instrument Panel Tie Bar Bolt (1) @ Floor Panel Tunnel Panel » Install and tighten [2x] — Fastener Specifications
-
Instrument Panel Tie Bar Bolt (1) » Install and tighten — Fastener Specifications
-
Use a suitable tool to push the tab (2) in the up position.
-
Heater and Air Conditioning Evaporator and Blower Module Bolt (1) » Install and tighten — Fastener Specifications
-
Use a suitable tool to push the tab (2) in the up position.
-
Instrument Panel Tie Bar Bolt (3) » Install and tighten — Fastener Specifications
-
Instrument Panel Knee Bolster Deflector (2) » Install
-
Instrument Panel Driver Knee Bolster Brace Bolt (1) » Install and tighten [4x] — Fastener Specifications
-
Data Link Connector (2) » Install
-
Data Link Connector Bolt (1) » Install and tighten [2x] — Fastener Specifications
-
Instrument Panel Carrier (1) » Install — Instrument Panel Carrier Replacement
-
{with C3A} Ground terminal (4) » Install 43.1. Connect the electrical connector. (3) 43.2. Ground Nut (2) » Install and tighten — Fastener Specifications
-
Instrument Panel Lower Trim Panel Insulator (1) » Install
-
Instrument Panel Lower Insulator Retainer (1) » Install [3x]
-
Clean the left and right side windshield wiper transmission pivot shaft splines with a soft wire brush before installing the windshield wiper arm.
-
Starting at the front of the right front side door sill garnish molding (1) engage the 2 retaining clips on the forward vertical wall.
-
Work your way rearward engaging all the right front side door sill garnish molding retaining clips.
-
Front Side Door Sill Garnish Molding - Right Side (1) » Install
-
Windshield Wiper System Module Shield (1) » Install
-
Air Inlet Grille Panel (2) » Install
-
Windshield Washer Nozzle Hose » Connect [3x]
-
Air Inlet Grille Panel Retainer (1) » Install [8x]
-
Hood Rear Outer Air Inlet Seal (2) » Install [2x]
-
Hood Rear Outer Air Inlet Seal Retainer (1) » Install [2x]
- Air Inlet Grille Panel Extension (1) » Install [2x]
- Remove the double layer of masking tape around the perimeter of the painted surfaces.
- Using a 50/50 mixture of isopropyl alcohol and clean drinkable water with a clean towel, remove any left over adhesive residue from the masking tape.
- Connect the negative battery cable. Battery Negative Cable Disconnection and Connection
-
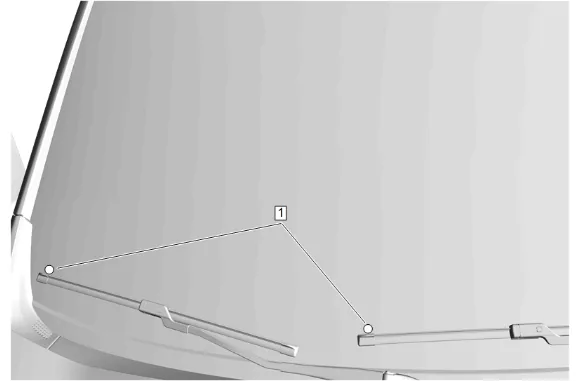
Align the windshield wipers to their respective alignment circles (1) on the windshield.
-
Windshield Wiper Arm (3) » Install [2x]
-
Windshield Wiper Arm Nut (2) » Install and tighten [2x] — Fastener Specifications
-
Lubricate the windshield with clean washer fluid.
-
Run the windshield wipers for two complete cycles then turn off the windshield wipers.
-
Ensure the windshield wipers are in the full park position.
-
If alignment is required, remove the windshield wiper arms and repeat steps 60 through 66 to achieve the proper windshield wiper (3) alignment.
-
Windshield Wiper Arm Finish Cap (1) » Install [2x]
-
Fill the cooling system. Cooling System Draining and Filling
-
Recharge the refrigerant. Refrigerant Recovery and Recharging
-
Inspect for refrigerant leaks.
-
Inspect for coolant leaks.